Backing Up Your Google Photos Library to an External Hard Drive
Hey there! Today, I want to talk about something really important – backing up your precious Google Photos library. I know how valuable those memories are to you, and it’s crucial to have a backup in case anything happens.
So, let’s get started. Here’s a step-by-step guide on how to back up your Google Photos library to an external hard drive.
First things first, make sure you have an external hard drive with enough storage space for your entire library. Trust me, you don’t want to run out of space halfway through the backup process!
Now, open up Google Photos and click on the three horizontal lines in the top left corner. A menu will appear – click on “Settings” in the dropdown menu.
In the “Settings” menu, scroll down until you see “Back up & sync.” Click on that option. You’ll find yourself in the “Back up & sync” settings.
Take a moment to marvel at the magic of technology – this is where you enable automatic backup for your photos and videos. You want to make sure this feature is turned on, so click on the toggle switch if it’s not already blue.
At this point, I suggest you click on “Back up device folders.” This will allow you to back up not just your main photos library, but also any other folders on your device that contain photos. It’s always better to be safe than sorry, right?
Once you’ve made sure the settings are to your liking, it’s time to connect your external hard drive to your computer. Make sure it’s properly connected and recognized by your device.
Now, you’re ready for the grand finale! Go back to the “Settings” menu in Google Photos and scroll down until you see “Download.” Click on “Download your data.”
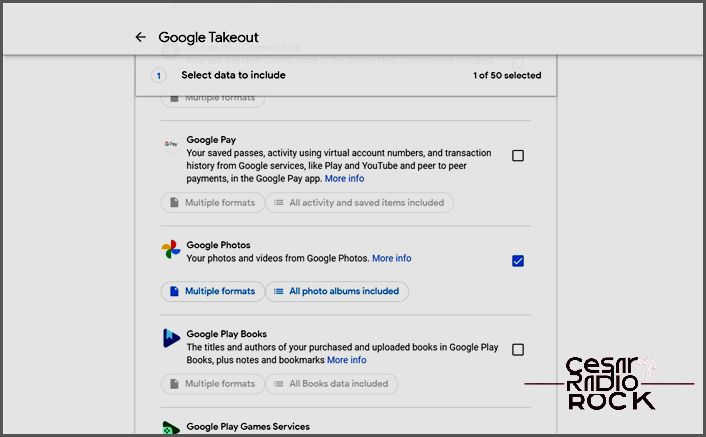
You’ll be taken to Google Takeout, where you can select the specific data you want to download. In this case, we want to download our Google Photos library, so click on “Deselect all” at the top of the page. Then, scroll down until you find “Google Photos” and select it. Easy peasy!
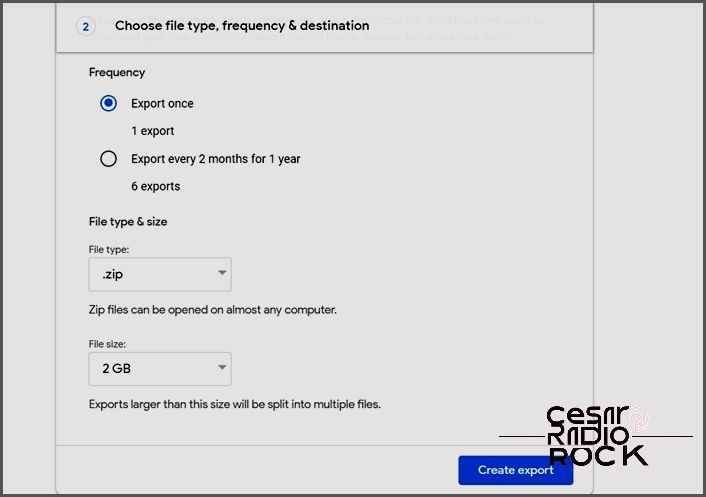
At the very bottom of the page, click on “Next.” Here, you can choose the file type, archive size, and delivery method for your backup. Take a moment to choose the options that suit you best.
Finally, click on “Create export” and wait for Google to work its magic. Depending on the size of your library, this might take a while, so be patient. Once it’s done, you’ll receive an email from Google with a link to download your backup.
And that’s it – you’ve successfully backed up your Google Photos library to an external hard drive! Now you can rest easy knowing your cherished memories are safe and sound.
Remember, it’s important to regularly update your backup to ensure all your new photos are protected. So, make it a habit to follow these steps every now and then.
Happy backing up!

Hey there! So, Google Photos is pretty awesome when it comes to storage space. But sometimes, you might still want to back up your data onto a hard drive, just to be safe. Now, moving a few videos and photos from your Google Photos account to an external drive is no biggie. But when you’ve got years of memories to transfer, things can get a bit more complicated.
And let’s not forget about accidentally deleted photos on Google Photos – that can be a real bummer. So, it’s always a good idea to have a backup somewhere else. That’s why I recommend backing up your Google Photos library onto an external hard drive. And guess what? It’s actually pretty easy to do! Here’s how:
How to Backup Your Google Photos Library to an External Hard Drive
There are three ways to move your Google Photos library to an external hard drive. Each method has its own pros and cons, but don’t worry – they’re all easy to do and won’t require too much effort on your part.
1. Do it Manually
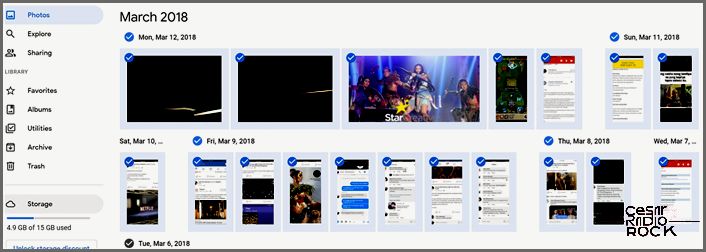
This is the simplest way to transfer your files from Google Photos to an external hard drive. The downside is that it can be a bit time-consuming if you have a ton of photos to move. But for smaller transfers, it’s a piece of cake. All you need is an external hard disk and a computer with Google Photos open. Just make sure to connect the hard disk before following these steps:
- Open Google Photos on your preferred browser.
- Go to your photos and click the check mark on the top left side of one of the photos.
- Hold down Shift and drag your mouse across all your photos to select them.

- Click the three-dot icon on the top right.
- Click Download.

- Extract the contents of the downloaded ZIP file and move them to the external hard drive.
This method is great when you only want to move selected photos or albums from Google Photos to an external hard drive, rather than your entire library.
2. Use Google Takeout
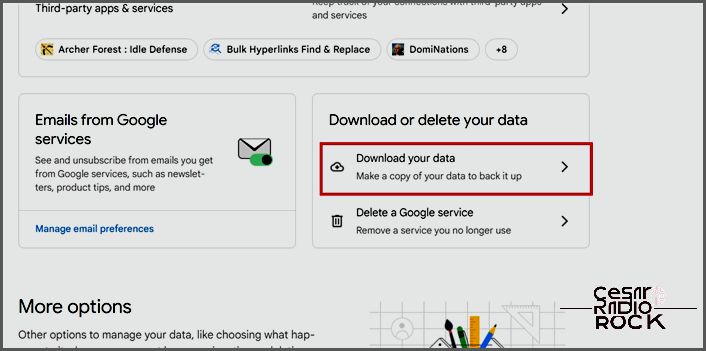
Now, if you’ve got a ton of photos and videos to copy, Google Takeout is the way to go. It’s a feature that lets you download and keep a copy of all your data across all of Google’s services, including Google Photos. Plus, it’s also super handy if you want to download other files from your Google account. Here’s how you can use it:
- Go to your Google Account homepage.
- Select Data privacy.
- Scroll down to Download or your data and click on Download your data.

- Click on Deselect all.
- Look for Google Photos and tick the box next to it.

- Scroll down and click on Next step.
- Select Send download link via email from the drop-down menu. Adjust the file and file size in the next sections.

- Click on Create export.
- Wait for the files to be sent to your email.
- Download the file and unzip the folder onto your hard drive.
The files will be sent to your email and may take a few days, depending on how large they are. So just be patient!
3. Use a Third-Party App
Last but not least, you can always rely on a third-party app to help you transfer your photos and videos from Google Photos to an external hard drive. There are plenty of free apps out there, but let me introduce you to one called Multcloud. With a free account, you can transfer up to 5 GB worth of media files per month from Google Photos to any other cloud service. And the best part? If you’re downloading the pictures to your external hard drive, you don’t have to worry about any data caps.

Unfortunately, Multcloud only allows you to download one file at a time. So, if you want to save multiple files, you’ll have to download them individually and then transfer them to your external hard drive through File Explorer.
Always Make Sure to Back Up Your Important Photos
Transferring all of your Google Photos pictures to an external hard drive is a relatively simple process, although it can be time-consuming. The good news is that you don’t need to rely on any third-party apps to do it. This method is perfect for anyone looking to declutter their Google Photos library or simply wanting to keep a backup of their cherished memories. But before you follow these steps, you might want to consider editing your videos on Google Photos to make them even more impressive.
Frequently Asked Questions
Q: How many times can I download my files using the Google Takeout feature?
A: You can download your files as many times as you want. Additionally, you can set up automatic backups of your files at regular intervals. This ensures that your external hard drive stays up to date with any changes made to your files.
Q: How long does it take for Google to send my files through Takeout?
A: The time it takes for Google to send your files depends on their size. According to Google, it can take anywhere from a few minutes to a few days if you have a large number of photos and videos.
Q: How long do photos and videos stay in the Google Photos bin before they are permanently deleted?
A: Files and photos in the Google Photos trash folder are kept for up to 60 days. After that, they are permanently deleted and cannot be recovered. As long as the 60-day period has not passed, you can retrieve your files at any time.
