Clearing Cache on Apple iPhone 7 and iPhone 7 Plus
Apple iPhone 7 and iPhone 7 Plus: A Guide to Clearing Cache
Greetings! Today, I will guide you through the process of clearing cache on your Apple iPhone 7 and iPhone 7 Plus. You might be wondering, what exactly is cache and why is it important to clear it?
Cache is a temporary storage area on your device that holds data from websites or apps you frequently visit or use. While cache can make accessing websites and apps faster, it can also become cluttered over time, taking up unnecessary space on your device and potentially causing performance issues.
Now, let us embark on this cache-clearing journey together.
Step 1: Open the Settings App
To begin, locate and tap the “Settings” app on your iPhone’s home screen. It can be easily recognized by its gear-shaped icon.
Step 2: Find the Safari Section
Once you are in the “Settings” app, scroll down until you see “Safari”. Tap on it to access the Safari settings.
Step 3: Clear Website Data
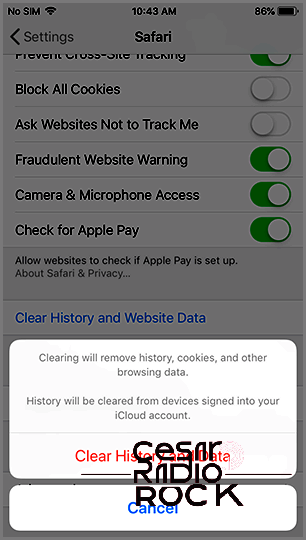
Within the Safari settings, find and tap on “Clear History and Website Data”. A dialog box will pop up asking for confirmation. Fear not, for this is the path to cache clarity!
Step 4: Confirm the Clearing
A warning message will appear, reminding you that clearing your history and website data cannot be undone. If you are ready to proceed, tap “Clear History and Data” to give your cache a well-deserved eviction notice.
Step 5: Done!
Congratulations! You have successfully cleared the cache on your Apple iPhone 7 or iPhone 7 Plus. Give yourself a pat on the back for taking care of your device and improving its performance.
Remember, clearing cache regularly can help keep your iPhone running smoothly and efficiently. If you encounter any issues or have further questions, don’t hesitate to reach out to Apple support or consult the user manual for your device.
Thank you for joining me on this cache-clearing venture. Until next time, take care and enjoy your iPhone experience!

Hey there iPhone 7 and iPhone 7 Plus users! It looks like you might be running into some issues with your iOS. You know how it goes – new software versions come out all the time, and while they’re supposed to make our phones better, sometimes they can introduce bugs and glitches that make things more complicated.
Luckily, I’ve got some good news for you. You might be able to fix your iPhone yourself! A lot of problems, from slow downs to crashing apps, can be easily solved with a few troubleshooting steps.
So, if you’re ready to take matters into your own hands, let’s talk about the easiest ways to fix any bugs or software problems on your Apple iPhone 7 or iPhone 7 Plus – by doing a factory reset or clearing the cache.
In this article, I’ll walk you through how to clear the cache on your Apple iPhone 7 or iPhone 7 Plus. Ready to get started? Let’s go!
How To Clear The App Cache On The Apple iPhone 7 And iPhone 7 Plus
If you’re only experiencing issues with a specific app, the first thing you should do is make sure that the app is up-to-date. If it is and you’re still having problems, try clearing the cache.
Now, there are two different places where you can clear the cache on your iPhone 7 or iPhone 7 Plus – Safari, the default browser, and the iPhone itself.
If you want to clear the cache specifically for the Safari browser, you’ll need to go into the Safari settings. This will only clear the cache for the browser.
If you want to clear the cache for your phone’s storage, you’ll need to go into the iPhone storage settings.
Here’s how you can clear the browser cache in Safari:
- Open your iPhone’s Settings.
- Scroll down until you find Safari.
- Tap on Safari.
- Scroll all the way down and tap on Clear History and Website Data.
- When the prompt comes up asking if you want to “remove history, cookies, and other browsing data. History will be cleared from devices signed into your iCloud account,” just tap on Clear History and Data.
To clear the cache of other apps, you can follow these steps. Just keep in mind that if you delete the app, you’ll lose all the information it stores, like your usernames, passwords, game progress, and preferences.
1. First, open the Settings app on your device.
2. Next, tap on General in the list of options.
3. Then, find and tap on iPhone Storage.
4. Look for the option that says “Manage Storage” and select it.
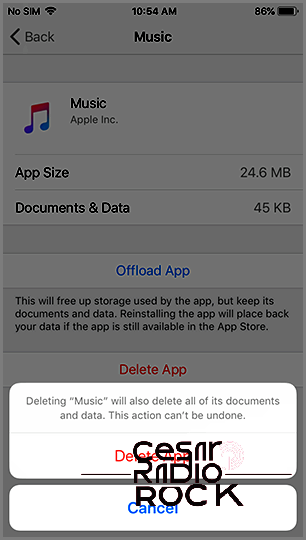
5. From there, choose the app you want to clear the cache for and tap on it to view its Documents & Data.
If you notice that the Documents & Data for a specific app is taking up a large amount of storage (over 500 MB), it might be worth deleting and reinstalling the app. Here’s how you can do it:
1. Tap on “Delete App” from the same menu where you viewed the app’s Documents & Data.
2. Once you’ve deleted the app, go to the App Store to install a fresh copy of it.
That’s it! Now you know how to clear the cache for other apps and free up some storage space on your device.
What to Do When Clearing the App Cache Isn’t Enough
If you’ve cleared the cache on Safari and individual apps but are still experiencing issues with your Apple iPhone 7 and iPhone 7 Plus, the next best step is to reset your device. Before resetting your iPhone 7 and iPhone 7 Plus, it’s important to back up all your data to ensure nothing gets lost during the process.
Try a Soft Reset on Your iPhone 7
If your phone is slowing down or taking longer to respond, a soft reset can help refresh it. This will close any rogue apps and restart all processes without deleting your data. It’s essentially like rebooting your phone, and it’s usually the first step when troubleshooting any phone issues.
A soft reset is slightly different from simply restarting or power cycling your phone. To perform a soft reset, follow these steps:
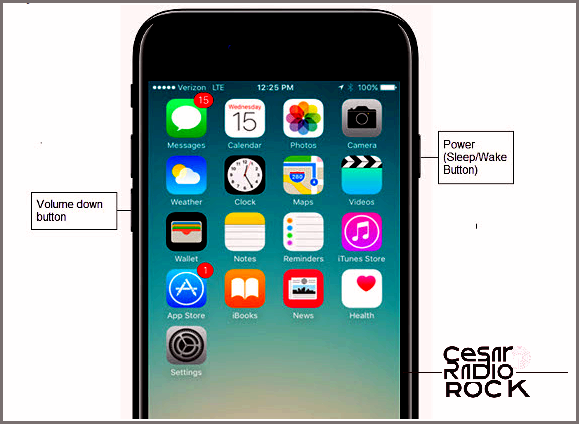
- To reboot your iPhone 7, simply press and hold the sleep/off button and the volume down button together for about 10 seconds.
- When you see the familiar Apple logo pop up on the screen, you can let go of both buttons.
- Wait a few seconds for the phone to fully power down, then press and hold the side button again to turn it back on.
Performing a soft reset like this is a good initial step to take because it forces your phone to close any running programs, while keeping all your important data intact.
Reset Your iPhone 7 to Factory Settings
If the previous method didn’t solve the issue and you’ve exhausted other troubleshooting steps, you may want to consider doing a factory reset on your iPhone 7. Keep in mind that this will erase everything on your device, including files, settings, preferences, and apps. Essentially, it will take your phone back to its original settings when you first got it.
Following a factory reset, any problematic apps or settings that could have been causing issues will be wiped clean, allowing you to start fresh and install applications one at a time.
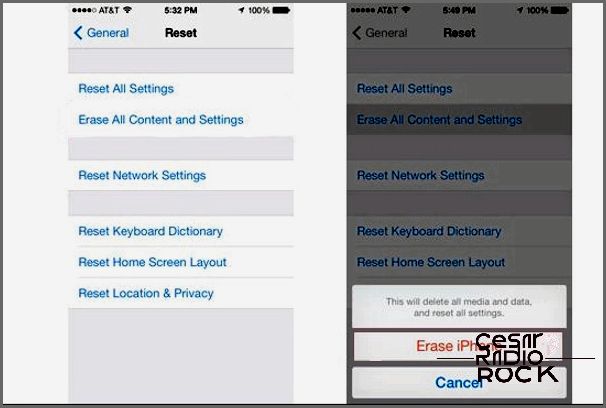
If you’re having issues with your iPhone, a factory reset is usually the solution. However, keep in mind that this will erase all of your personal data. The easiest way to perform a factory reset is to use iTunes.
You’ll need to access iTunes to back up your files and settings anyway, so you might as well take advantage of the one-stop-shop approach and let iTunes handle the factory reset for you.
- Connect your phone to your computer and open iTunes.
- Back up your files and settings in iTunes.
- Select your iPhone in iTunes and click on “Summary” in the left menu.
- Click on “Restore iPhone” in the right pane.
- Confirm your choice by clicking on “Restore” in the pop-up window.
Once the reset is complete, your iPhone will restart and take you to the initial setup screen. Set up the basics from there and reconnect it to iTunes. You can then reload your files and settings directly from iTunes if needed.
However, using iTunes is not the only way to perform a factory reset. If you prefer not to use iTunes, you can do it directly on your iPhone 7.
- Go to Settings.
- Tap on “General”.
- Tap on “Reset” and then select “Erase All Content and Settings”.
- Enter your passcode or Apple ID to confirm the reset.
- Wait for your phone to complete the reset and restart.
After the reset, check if the issue you were experiencing still persists.
If you’re still having problems, it’s best to seek help at an Apple Store Genius Bar. They will either fix the issue or provide a replacement if your device is under warranty or Apple Care.
Sometimes, the problem may be related to the hardware, like a faulty logic board. In such cases, contacting Apple Support or considering an upgrade to a newer model may be the only options.
