Tutorial: Converting and Encoding Audio Files with Mac OS X Finder
Hey there! Today, I want to share with you a neat trick I learned for converting and encoding audio files on Mac OS X using the Finder. It’s super handy if you need to change the format of your audio files or make them compatible with different devices.
First things first, let’s talk about what exactly converting and encoding mean in the context of audio files. Converting refers to changing the file format of your audio file, while encoding involves compressing the audio data to make the file size smaller without sacrificing too much quality.
So, why would you want to convert or encode audio files? Well, there are a few reasons. Maybe the audio file you have is in a format that is not supported by the device you want to play it on. Or perhaps you want to save space on your computer or device by compressing the audio file.
Now, let’s dive into the process of converting and encoding audio files using Mac OS X Finder. It’s really quite simple!
Step 1: Locate the audio file you want to convert or encode. This could be a song, a podcast, an audiobook, or any other type of audio file. Make sure you know where it is saved on your computer.
Step 2: Right-click (or Control-click) on the audio file and select “Encode Selected Audio Files” from the context menu. A sub-menu will appear with a list of different audio formats you can choose from for the conversion.
Step 3: Choose the desired audio format from the sub-menu. For example, if you want to convert your audio file to MP3, select “Create MP3 Version”. Mac OS X will then create a new version of the audio file in the selected format.
Step 4: Once the conversion is complete, you will have two versions of the audio file – the original file and the newly converted file. The newly converted file will have the same name as the original, but with the file format extension changed to reflect the new format.
And that’s it! You have successfully converted and encoded your audio file using Mac OS X Finder. Now you can enjoy your audio on any device or save space on your computer by compressing the file.
I hope you found this tutorial helpful and that it makes managing and using your audio files a breeze. Give it a try and let me know how it works for you. Happy converting!

Hey there! So, if you’re looking to convert or encode your audio files on OS X, I’ve got a couple of options for you. You can go with the usual suspects like iTunes, QuickTime, or third party software. But did you know that OS X actually has a built-in AAC encoder right in Finder? Yeah, it’s pretty handy! And the best part? You can convert your audio files with just two clicks. Here’s how you do it on OS X Lion and beyond.
First things first, there are a few limitations to this method. It only works with certain file types like AIFF, AIFC, Sd2f, CAFF, or WAVE. And it only outputs to four AAC presets. But don’t worry, these presets cover a wide range of uses and should work just fine for most Mac users who manage their music in AAC formats.
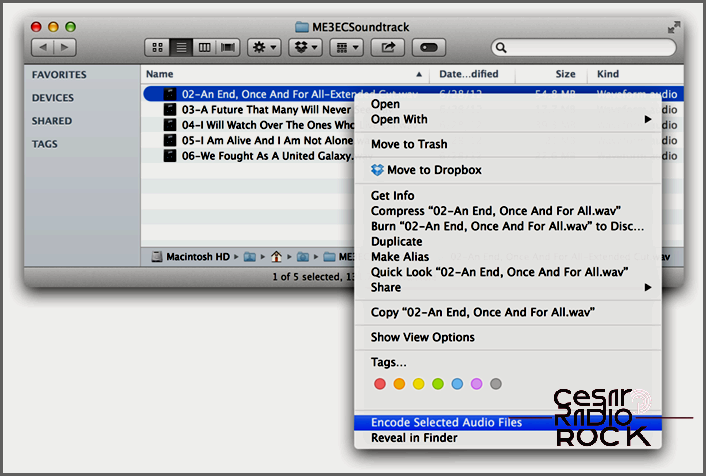
Alright, let’s get started. Head over to Finder and find the audio files you want to convert. You can select a single file or multiple files for a batch conversion. Once you’ve got your files selected, right-click (or Command-click) on them and choose “Encode Selected Audio Files.”
Oh, you want a visual guide? No problem. Check out this screenshot for reference:

Alternatively, if you prefer using the Menu Bar, you can go to “Finder > Services > Encode Selected Audio Files.” Simple as that!
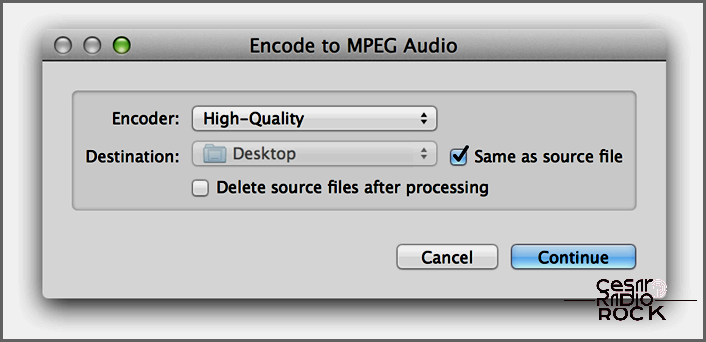
And then a window called “Encode to MPEG Audio” will pop up with a few options. You’ll be able to choose from four settings: High Quality (128kbps), iTunes Plus (256kbps), Apple Lossless, and Spoken Podcast (variable, about 64kbps for stereo).

First, let’s decide where you want to save the converted files. Typically, the encoder will save the encoded files in the same folder as the original files. But if you’d like to add the encoded files to iTunes, you can use a specific path as your destination. This way, the files will be automatically added to your iTunes library the next time you open the app.
~/Music/iTunes/iTunes Media/Automatically Add to iTunes

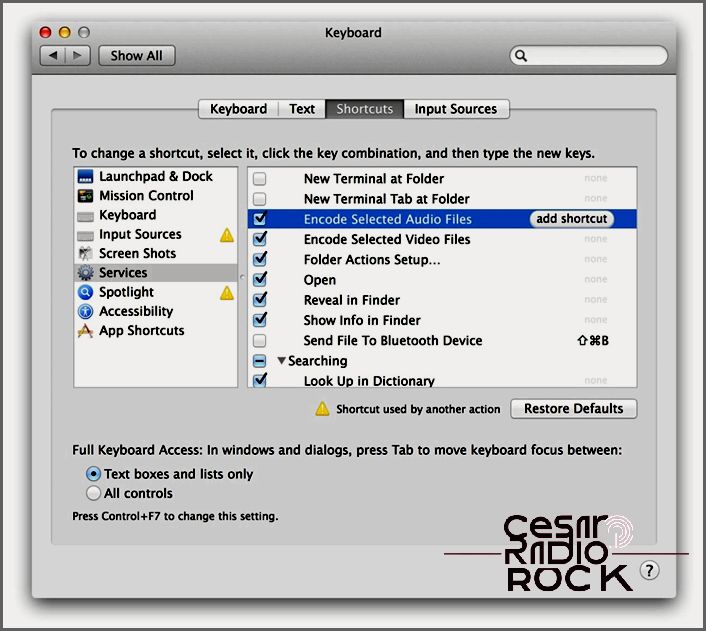
Finally, you have the option to let Finder delete the original file once it finishes converting the audio. Just click Continue to confirm your settings and start the encoding process. Encoding a typical song should only take a few seconds, and you’ll have your desired audio file without needing to open another application.The audio conversion feature in OS X isn’t as versatile as other choices like QuickTime, but it’s quick, easy, and should meet the needs of most users who want to convert audio to the Apple-friendly AAC format.Can’t find the “Encode Selected Audio Files” option in Finder? It’s possible that you accidentally turned off this feature. To re-enable it, go to System Preferences > Keyboard > Shortcuts > Services and make sure that “Encode Selected Audio Files” is checked in the list on the right side of the window.
