Posting a GIF on Facebook: A Step-by-Step Guide
Hey there! Are you wondering how to share an awesome GIF on Facebook, but aren’t sure where to start? Don’t worry, I’ve got you covered! With just a few simple steps, you’ll be able to share your favorite animated images with your friends and family. Let’s dive right in!
First things first, let’s make sure you have the perfect GIF ready to go. GIFs are short animated images that can add some fun and excitement to your Facebook feed. You can find GIFs on various websites or create your own using tools like Giphy or Tenor.
Once you’ve found the GIF you want to share, it’s time to upload it to Facebook. Here’s what you need to do:
Step 1: Go to your Facebook home page.
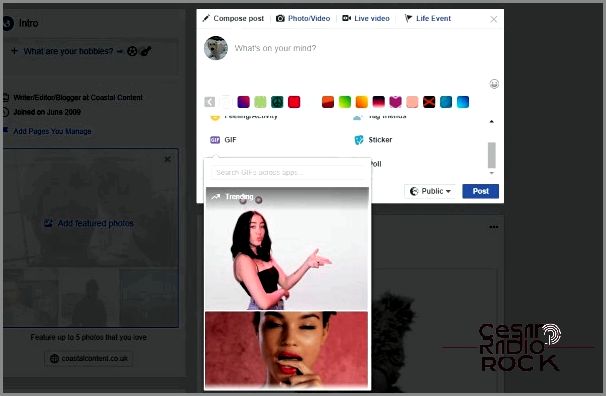
Step 2: On your timeline or newsfeed, click on the “What’s on your mind?” box – you’ll see it at the top of the page.
Step 3: In the text box, you’ll notice a range of icons below. Look for the one that says “GIF” and click on it. It should be next to the camera icon.
Step 4: A window will appear, allowing you to search for GIFs. You can either enter a keyword or browse through popular categories to find the perfect GIF.
Step 5: Once you’ve found the GIF you want to share, click on it. You can also preview it by hovering over the GIF before making your selection.
Step 6: After clicking on the GIF, it will automatically be added to your post. You can add a caption or any other text you want to include with the GIF.
Step 7: When you’re ready, click on the “Post” button, and voila! Your GIF will be shared with all your Facebook friends.
It’s important to note that not all GIFs are supported on Facebook. If you come across a GIF that doesn’t work, it may be due to its file size or compatibility. You can always try finding a different GIF or create one yourself to ensure it works smoothly on Facebook.
Now that you know how to post a GIF on Facebook, you can start adding some animated fun to your social media experience. So go ahead, find that perfect GIF, and share it with the world! Have a blast, and happy posting!

When Facebook first came onto the scene, they weren’t really into the whole GIF thing. They were afraid it would make the site look messy and cluttered. But, as you know, GIFs are pretty much everywhere now, so Facebook didn’t really have a choice but to join in on the fun. And lucky for us, they did! Now, I’m going to show you how you can post a GIF on Facebook too.
Now, I know not everyone is a fan of GIFs. Some might think they’re lame or just plain dumb. But, let me tell you, there are actually a few really clever ones out there. And if you’re into GIFs and want to share them with your friends, you totally can! Although, I must warn you, it’s not as straightforward as it could be to post a GIF on Facebook. But don’t worry, I’ve got you covered. Here’s what you need to do:

What is a GIF?
Hey there! Let me tell you about GIFs. So, a GIF stands for Graphics Interchange Format image. But here’s the interesting part: it’s not just a single image, it can actually be a whole series of frames packed into one image file. That’s why they can have animations, because the image file plays those frames on a loop. Technically, a GIF file is just a static image, but we usually call both types of GIF files.
Posting a GIF on Facebook
Okay, so not too long ago, if you wanted to post a GIF on Facebook, you had to create the GIF file on your own device, upload it somewhere like Giphy or Imgur, and then share the link in your Facebook post. But guess what? Now, Facebook has made it even easier! You can directly post GIFs on Facebook without having to go through all that.
If you want to add a GIF to a post or comment on Facebook, here’s what you do:
- First, just compose your post or comment like you usually would.
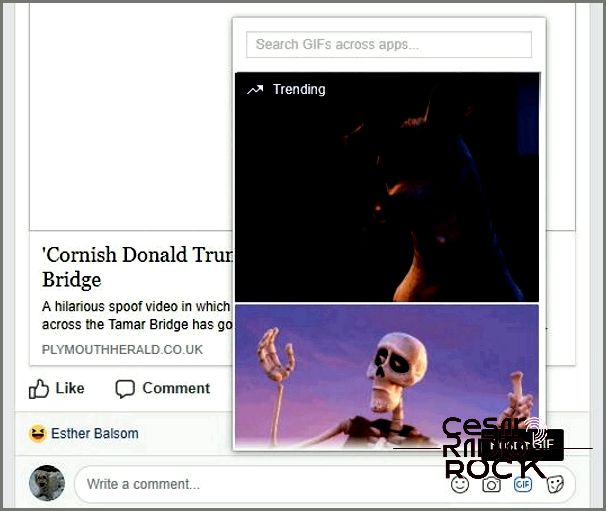
- Then, look for the small gray GIF icon in the input box.
- Click on that icon, and you’ll see a bunch of trending GIFs to choose from. If none of those catch your eye, no worries! You can also search for a specific GIF using the search bar at the top.
- Once you’ve found the perfect GIF, simply select it to add it to your post or comment.
Oh, and by the way, there are tons of pre-selected trending GIFs available in the selection box. Just keep scrolling down and you’ll see more and more. It feels like the list is endless! But if you’re looking for something specific, you can always type in your search term at the top to find a GIF that suits you better.

How to Post a GIF in Your Facebook Status
Hey there! So, you wanna share a cool GIF in your Facebook status, huh? Well, you might be surprised to know that you still have to do it the old-fashioned way. But don’t worry, it’s not too tricky.
First things first, you need to find or create a GIF. There are sites like Giphy or Imgur where you can find tons of awesome GIFs. Let’s go with Giphy for now.
- Find the perfect GIF for your status update.
- On the right side of the GIF, click on “Copy Link”.
- Choose “Short Link” and copy it.
- Paste the link into your Facebook status update.
- Feel free to edit it or add any comments you want.
Voila! Once you add the link, the GIF should appear in your update. If you don’t want the short link to show, you can remove it later and the GIF will still be there.
Creating Your Own Animated GIF on Giphy
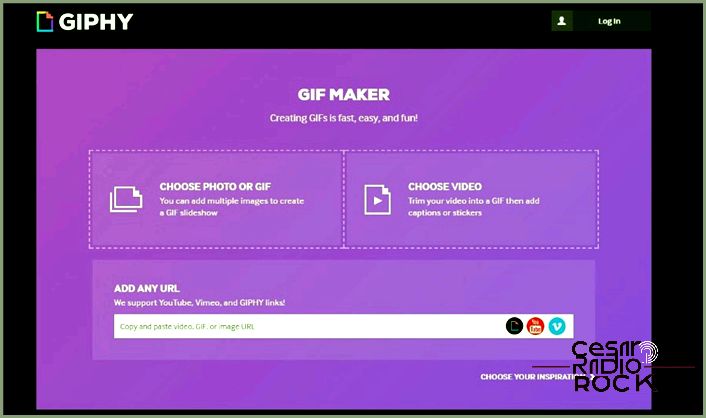
Now, what if you can’t find the perfect GIF that captures your exact situation or emotion? No worries! You can make your own animated GIF with Giphy. It’s actually pretty straightforward, even if Giphy doesn’t make it very clear.
- Select an image or video that you want to turn into a GIF, and upload it to the GIF creation page on Giphy. If you’re going for an animated GIF, make sure you have a series of images to create the animation.
- Arrange the images in the order you want to create the animation.
- Set the duration for how long the GIF should run before it loops.
- Add any captions, effects, or tags you want to the series.
- Click on “Create GIF” to make it happen!
- Before sharing your GIF, take a moment to edit and review it.
If you prefer using a video instead, you can upload it to Giphy and set the start time for the first frame of the GIF, along with the desired duration. It might take a little practice to get the timing just right, but trust me, it’s not too hard. After that, you can follow the same steps mentioned above to add captions or tags before saving your creation.
And there you have it! Once your GIF is all done, use the Short Link I mentioned earlier to share it on Facebook or anywhere else you like.
Posting a GIF on Facebook has become much easier, but let’s be honest, it’s still not as simple as we’d like it to be. But hey, now you have a good idea of how to do it!
Do you know any other tricks or tools to post GIFs on Facebook? If you do, feel free to share them with us below.
