Fixing the Persistent Issue: Sigh, com.android.phone Has Stopped
Hey there! So, I’ve got some great tips to share with you about dealing with an annoying problem that keeps popping up on your Android phone. You know what I’m talking about, right? That frustrating message saying “com.android.phone has stopped.” Ugh, it can be so exasperating!
But fret not, my friend! I’ve got your back. I’m here to walk you through some excellent fixes to tackle this persistent headache. Trust me, it’s time to bid farewell to that pesky error once and for all!
First things first, let’s dive into the nitty-gritty of this issue. It’s no fun when our beloved phones start acting up, especially when we rely on them so much. So, why does this “com.android.phone has stopped” error keep appearing? Well, the culprit can be any number of things, from a glitchy app to a problem with your phone’s software.
But enough of the technical talk, let’s get down to business! Here are some tried-and-true methods to get you back on track:
1. Restart Your Phone: This might sound like a no-brainer, but sometimes a simple restart is all it takes to shake things up. Give it a try and see if the error message disappears like magic!
2. Clear Cache and Data: Ah, the wonders of clearing cache and data. It’s like giving your phone a fresh start! Head over to the Settings menu, find the “Apps” or “Applications” section, and locate the “Phone” app. From there, tap on “Storage” and hit the “Clear cache” and “Clear data” buttons. This can often do wonders for stubborn issues like this one.
3. Update Your Apps and Software: One of the keys to a happy phone life is staying up to date. Make sure all your apps and software are on the latest versions. Updates often come packed with bug fixes and improvements, which might just solve the problem for you.
4. Check SIM Card and Network Settings: Sometimes, the issue might be with your SIM card or network settings. Double-check that your SIM card is properly inserted and functioning. Additionally, give your network settings a quick once-over to ensure everything is in order.
5. Disable or Uninstall Problematic Apps: If the error message only appears when using a specific app, it could be the culprit. Try disabling or uninstalling that app and see if the error goes away. You can always reinstall it later if you need it.
And there you have it, my friend! These fixes should help you kick that annoying “com.android.phone has stopped” message to the curb. Remember, if one method doesn’t work, don’t lose hope! You’ve got an arsenal of solutions at your disposal. Keep trying until you find the perfect fix for your phone.
Now, go forth and conquer those tech gremlins! Your Android phone will thank you, and you’ll be back to enjoying those smooth, error-free days in no time.

Android has come a long way since it was first introduced as a mobile operating system. Over the years, it has evolved into a great service with a sleek design and modern features like split-screen multitasking and improved notifications. It’s no wonder that Android is one of the most popular operating systems worldwide. Google works hard to make each upgrade better than the last, with improvements in performance, battery life, and overall user experience. Users of devices like the Samsung Galaxy S8 or LG G6 are happier than ever with their Android devices.
However, Android is not without its flaws. Sometimes things can get buggy, and you might encounter occasional crashes or error messages on your phone. These issues usually stem from misbehaving apps that you’ve installed, and the fix is usually as simple as uninstalling and reinstalling the problematic app. But things get more complicated when the error messages are coming from system apps that you don’t have control over. These apps can be a hassle to deal with, and since their updates are not pushed through Google Play, you’re left to solve the problem on your own.
Luckily, troubleshooting error messages on Android follows a similar pattern, which makes it easier to fix the problem. One particularly frustrating message is “Unfortunately com.android.phone has stopped,” which refers to the phone system on your Android device. This error can prevent you from making phone calls and can be quite vague, making it difficult to figure out what’s causing the issue. But don’t worry, it’s not an unsolvable problem, and we have some solutions for you to try based on general Android troubleshooting and user feedback.
Let’s dive into the solutions and ways to get your phone working again. Firstly, you can try clearing the app data and cache for the problematic apps. This can often solve app crashes and holds true for the phone application on your device as well. Despite being a system app, you can easily reset its data and cache within your phone’s settings. The best part is that you won’t lose any data from your device by doing this.
To access the apps menu, go to your settings menu on your Android device. The location of the apps menu may vary depending on your phone’s manufacturer and software. Look for an “Apps” or “Application Manager” option under the “Phone” or “Device” categories. Tap on this option to see a full list of your installed apps. If you can’t find the phone or dialer app, you may need to select “Application Manager” from a sub-menu.
Once you have the full list of your phone applications, you need to find two specific apps. The first is your phone or dialer app, which is usually hidden under the system applications menu. To display these apps, tap on the triple-dotted menu icon in the top-right corner of your phone’s display and select “Show system apps” from the drop-down menu. This will reveal all the apps on your device, including those that are typically inaccessible.
Now that you can see all the installed and system apps on your phone, you need to find both the SIM Toolkit application listing (often named “SIM Toolkit”) and the actual phone app. Finding the phone app can be tricky since it may have different names depending on your phone’s manufacturer. Look for app names such as “Phone,” “Dialer,” or “com.android.phone.” In some cases, there may be multiple apps named “Phone,” so it might take some trial and error to identify the right one. If the app has a technical name like “com.android.phone,” you’ll likely find it near the top of the list in the “C” section of your apps. Keep in mind that most of the “com.[app_name]” apps are hidden under the System Apps category, so you’ll need to reveal this content using the option mentioned earlier.
By following these steps, you’ll be able to clear the app data and cache for the phone app and hopefully resolve the error message. Remember that troubleshooting Android errors is usually a straightforward process once you know the pattern. Don’t let these problems discourage you from enjoying your Android experience. With a little effort and some troubleshooting, you’ll be able to get your phone working smoothly again.

When you find both the SIM Toolkit app and the corresponding Phone app(s), click on each one in the list. Once you open the application info for each app, go to the “Storage” option in the app’s settings. On older versions of Android, you might see the Clear Cache button right there, but on Android 6.0 Marshmallow and newer, you’ll have to navigate through a “Usage Info” display to access your storage and cache information. In the Storage menu, you’ll find two options: Clear Data and Clear Cache.
Clearing the Data for your apps will refresh the software, but keep in mind that it may also wipe your phone log. If you’re worried about losing that information, you can use an app like SMS Backup and Restore, which can backup your list of outgoing and incoming phone calls, as well as call logs. On the other hand, Clear Cache will refresh and clear the app’s cached data, making it a helpful step to reset any error messages you might be experiencing. By tapping on Clear Cache, you’ll see the stored cache data decrease to zero bytes. There won’t be a prompt or link, as clearing an app’s cache isn’t as risky as clearing its data.

If you’re having trouble with your Phone and SIM Toolkit apps, try resetting the cache and data. After that, restart your phone to see if you can make calls without the Phone app crashing. This usually does the trick for most people. Sometimes, software can get a bit messy, but clearing your app data and cache can help fix any lingering bugs. However, if you’re still seeing the same error message even after restarting, don’t worry. I’ve got more strategies to help fix your device.
Gently insert your SIM card again
This may seem like a simple solution, but it often works. Since the error message is related to the “phone” part of your smartphone, it’s a good idea to make sure there are no issues with the connection to your cellular network through your SIM card. Your SIM card provides important information for your phone to connect to the mobile network. It’s possible that something like a drop or a bug has caused software problems, even if the SIM card is still physically in your phone.
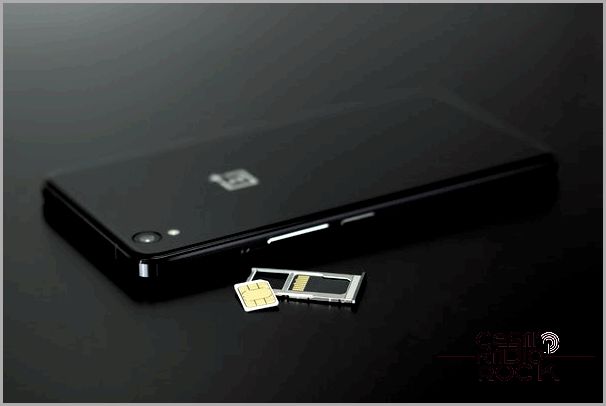
To get started, turn off your device. Then, use the SIM tool that came with your phone (or a paper clip if you can’t find it) to remove the SIM tray. Take a look at the SIM card and make sure it’s in good condition, without any dust, water, or damage. It’s important to do this with the phone off because removing the SIM card while the device is still powered on could potentially damage the information on your SD card if your phone has a dual SIM and SD card tray.
After inspecting the SIM card, put it back into the tray and push the tray back into your phone until it locks in place. Once you’ve reinserted the SIM card and tray, turn your phone back on and check if the error message still appears when you’re connected to the network. We’re not done troubleshooting the SIM card yet, but we’ll come back to it in a later step.
Resetting Wireless Connections
Now that you’ve tested the SIM card and powered your device back on, the next step is to reset the wireless connections on your phone. This process might be a bit different on each phone, but most devices should follow similar instructions. Open the settings menu on your phone, either through the settings shortcut in your notification tray or the app drawer. Look for an option to reset your device, usually located towards the bottom of the menu and labeled “Backup and reset” or something similar.
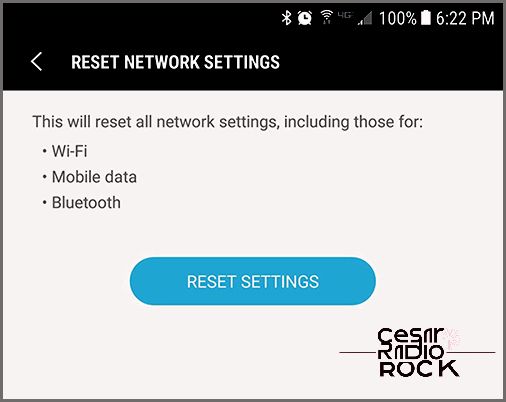
Hey there! I’m here to help you fix that annoying error message on your phone. First, let’s go through the steps to reset your network settings and give your phone a fresh start.
Inside the settings menu, you’ll find the reset options. Don’t worry, we’re not wiping your whole device, just the network settings. Look for the “Reset Network Settings” option and select it. This will reset your WiFi, mobile data, and Bluetooth connections.
After the reset, you’ll need to repair your Bluetooth devices and enter your wireless passwords again. Once that’s done, restart your phone and test if the error message still pops up. If it doesn’t, you’re good to go!
But if the error message keeps showing up, don’t worry, we’ve got more tips to try.
Force Cycle Your Device (If You Can’t Reach the Settings Menu)
If you’re having trouble reaching the settings menu because the crash notice keeps appearing, there’s still hope. Hold down your device’s power button for about thirty seconds to force a power cycle. This might turn off or restart your phone, but it could also bypass the error message and let you try the other steps on this list. Some users have even solved the issue entirely with a forced power cycle.
Restoring Your Original Software (Custom ROM Users Only)
Now, this tip is only for a small number of users who have rooted their devices and are running custom ROMs. These custom versions of Android might be causing bugs and issues. If that’s the case, get in touch with the creator of the ROM or return to the standard version of Android for your device. While custom ROMs have their benefits, sometimes the problems they create aren’t worth it.
If you’re looking for the original software for your device, you can find it on XDA’s forums. They usually have a list of original software for different devices. Once you’ve restored your phone to its stock condition, check if the crash still happens.
Clear System Cache
If you’ve tried everything and you’re still experiencing error messages and crashes, it’s time to clear your system cache. It’s similar to clearing the app cache we did earlier but on a larger scale. To do this, we’ll use Android’s recovery mode, a bit of a technical procedure.
Before we begin, make sure your phone is completely powered off. Then, we’ll use a combination of buttons to boot your device into recovery mode. The button combination depends on your phone model, so here are some popular ones:
- Nexus and Pixel devices: Hold the Power and Volume Down keys until you see an Android icon. Use the Volume Down key to select “Recovery Mode” and press the Power key. Your device will load into recovery.
- Samsung devices prior to the S8 and S8+: Hold the Power, Volume Up, and Home keys together until the Samsung logo appears. Release the keys, and recovery mode will load after a few seconds.
- LG G7 and other LG devices: Hold the Power and Volume Down keys together until the LG logo appears. Then, let go of the Power key and press it again while still holding the Volume Down key.
- For other devices, search for “[your phone model] boot into recovery” to find the specific button combination.
Once you’re in recovery mode, use the appropriate buttons to navigate and select “Wipe cache partition.” This won’t delete any data or apps, but it will clear out any temporary data that can cause issues. Be patient, as this process may take a while.
After clearing the cache partition, reboot your phone and see if the error messages persist.
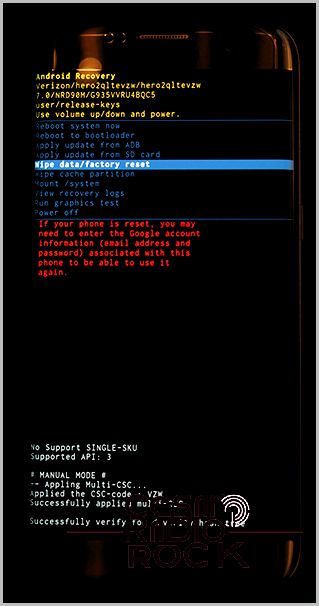
When you find yourself in recovery mode (as shown in the photo above), use the volume keys to scroll up and down. Scroll down until you see “Wipe Cache Partition” on the menu. It’s located below the highlighted blue line in the picture. Be careful not to select this option unless you want to erase everything on your phone. Once you’ve highlighted “Wipe Cache Partition,” press the Power key to choose the option. Then, use the Volume keys again to highlight “Yes” and press the Power key once more to confirm. Your phone will start clearing the cache partition, which will take a few moments.
Hang in there while the process continues. Once it’s finished, select “Reboot device now” if it’s not already selected and press the Power key to confirm. After your device restarts, try making a new phone call to a friend or wait to see if the error message appears again. If it doesn’t, you’re good to go. You can return to using your phone as usual. If the error message still pops up, don’t worry. We have one more troubleshooting step to try: a full factory reset.
Factory Resetting Your Phone
Yes, unfortunately, like most issues with modern technology, sometimes the only way to fix software-related errors is by doing a factory reset. Nobody really wants to do this, but in some cases, it’s the only solution to troubleshoot error messages on your device. If you’ve tried everything else on this list and you’re still getting error messages when making or receiving calls (or even when using your phone), then you need to proceed with a device reset.
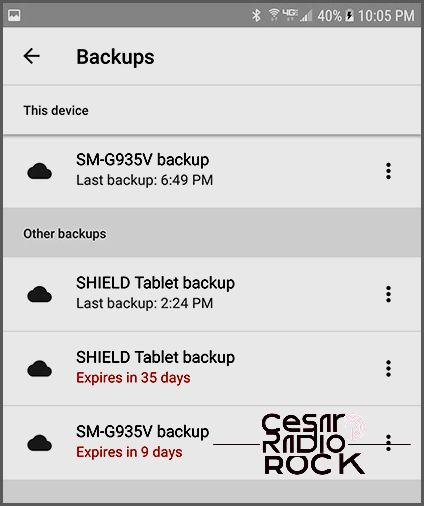
To begin, let’s make sure all your precious stuff is safe and sound. Take a moment to back up your phone to whichever cloud service suits your fancy, whether it’s Google Drive, Samsung Cloud, or some other service of your choosing. For the nitty-gritty details, you can use nifty apps like SMS Backup and Restore or Google Photos to backup your text messages, phone call logs, and photos separately.
Once your phone is all backed up and ready to roll (or if you’ve cleverly stashed your important files on an SD card or separate computer), it’s time to kickstart the factory reset process.
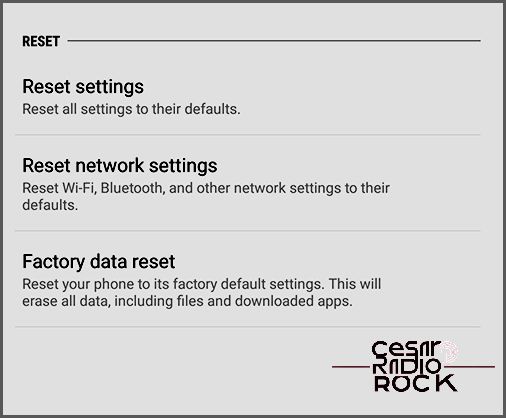
To start the process, go to your settings menu and look for the “Backup and Reset” option in your preferences. It’s usually towards the bottom, but its exact position might vary depending on your phone’s software. Keep in mind that the screenshots here are from a Galaxy S7 edge, so Pixel or Nexus users may see a slightly different display.
Once you’ve found the settings menu, open it and select “Backup and Reset.” On the standard settings menu, you’ll find it under “Personal,” and on the simplified display, it’s located under “General management.” Look for the third reset option, which is called “Factory data reset.”
When you choose this option, a menu will appear showing all the accounts you’ve signed into on your phone. You’ll also see a warning that explains that everything on your device will be erased. Keep in mind that your SD card won’t be affected unless you decide to select the “Format SD card” option at the bottom of the menu. It’s up to you whether you want to do this, but it’s not necessary for the reset process.
Before you proceed, make sure your phone is either plugged in or fully charged. A factory reset can use quite a bit of power and can take up to thirty minutes or more to complete. You definitely don’t want your phone to die during this process. So, double-check that it’s properly charged before selecting “Reset phone” at the bottom of the menu.
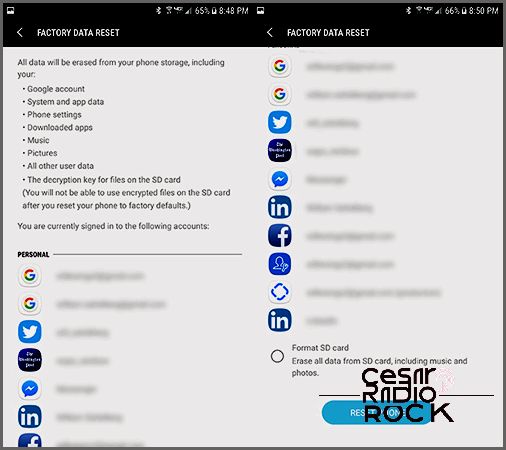
Once you’ve made sure your device is charging or fully charged, simply click on “Reset phone” and enter your PIN or password for security verification. After doing this, your phone will start the reset process. Just let it do its thing. Once the reset is done – which can take around thirty minutes or even longer – you’ll be prompted to set up your phone again. During this process, you’ll need to reconnect to your WiFi network and sign back into your Google account. Once you’re done with the setup, try using your phone as you normally would to test if it’s functioning properly. Make sure to place and receive phone calls to put your device to the test.
Contacting Your Cell Provider
If you’ve tried all of the above and nothing seems to work, feel free to get in touch with your phone’s network provider. Usually, after going through their own troubleshooting guide – which might not be as detailed as the instructions I just gave you – they’ll usually give you the option to get a replacement device or send your phone in for repair, especially if it’s still under warranty. Before you go that far, though, I suggest reaching out to your cellular provider to ask for a new SIM card. You’d be surprised how often issues like these can be solved just by trying out a new SIM card connected to your account. Typically, you can get a new SIM card for your device from any cellular retailer for free, although some might charge a small fee (usually under $20) for a new card.
If you’ve already tried a new SIM card and you’re still dealing with software problems on your phone, it might be time to either get a new device (if your current phone is old and you have an available upgrade) or go through the warranty claim process, if applicable.
Encountering random errors on your Android phone can be incredibly frustrating. It’s especially annoying when error messages keep popping up out of nowhere. But don’t worry, most technical problems on Android can be solved using standard troubleshooting techniques, and dealing with application crashes is no exception. Even though it can be a frustrating experience, don’t throw your phone against the wall before trying the tips I mentioned earlier. Hopefully, one or more of those suggestions helped you solve the issue with your phone’s error messages. If not, let us know in the comments below and we’ll do our best to assist you. Here at TechJunkie, we have a wonderful community of readers and writers, and there’s always someone ready to step in and help you out with the process.
If you’re experiencing other common Android errors, we have plenty of guides available to help you troubleshoot those problems. You can check out our tips for resolving issues like “Unfortunately android.process.media has stopped” and “android.process.acore has stopped working” right here.
