How to Start Up from a USB Drive on MacOS
Hey there! Today, I want to show you how to boot up your Mac from a USB stick. It’s really helpful when you want to install a new operating system or recover your computer.
First things first, make sure you have a USB stick that’s ready to go. It should be connected to your Mac, all set with the software you need. Now, let’s dive in!
Step 1: Power off your Mac completely. Don’t put it to sleep or just restart it. We need a full shutdown here.
Step 2: Once your Mac is all powered down, it’s time to turn it back on. But we don’t want to use the regular startup disk. So, hold down the Option (⌥) key on your keyboard and press the power button. Keep holding down the Option key until you see the Startup Manager window on your screen.
Step 3: In the Startup Manager window, you’ll see a list of available startup disks. You should see your USB stick listed there. Use the arrow keys on your keyboard to select it, then hit the Enter key. Your Mac will now start up from the USB stick.
Step 4: Now that your Mac has booted from the USB stick, you can go ahead and do what you need to do. If you’re installing a new operating system, follow the on-screen instructions. If you’re recovering your computer, you can use the recovery software on the USB stick.
That’s it! You now know how to boot up your Mac from a USB stick. It’s a handy skill that can save you time and help you troubleshoot any issues. Remember, whenever you want to start up from the USB stick again, just follow these steps. Happy computing!

Hey there! Have you ever encountered issues with your Mac or wished to try a different version of MacOS? Well, I’ve got some good news for you. Since Mavericks, Apple has made it possible to create a bootable USB stick for MacOS. Why would you need one, you ask? Well, it can come in handy when you need to fix a problem or even reinstall MacOS. In this guide, I’ll walk you through the process of creating a bootable USB stick using MacOS. Let’s get started!
Getting Your USB Stick Ready
First things first, you need to prepare your USB stick. Here’s what you should do:

First things first, before you do anything with the USB stick, it needs to be at least 8GB in size. Make sure you have all the important files saved somewhere else because we’re going to erase the USB stick and make it compatible with Mac. To prepare it, follow these steps:
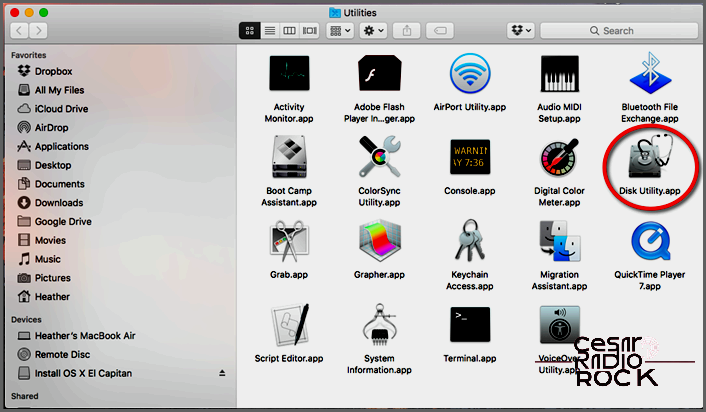
1. Open Disk Utility by going to Applications > Utilities > Disk Utility.
2. In Disk Utility, you’ll see your USB drive listed. Click on it, then select “Erase.”
3. Leave the USB stick named as “Untitled.” Choose “Mac OS extended (Journaled)” as the format and “GUID Partition Map” as the scheme.
4. Now, click on the “Erase” button and Disk Utility will prepare the USB stick for the next steps.
Wait for Disk Utility to complete its task, and once it’s finished, close it.
Creating a Bootable USB Stick
Next, you’ll need to go to the Mac App Store on a Mac laptop or computer. If your current OS is still working, you can access it there. If not, you can ask a friend who has a Mac to borrow theirs and follow these steps:
- In the Mac App Store, download the operating system installer.
- If the installer opens automatically, press the “ESC” key on your keyboard to quit it.
- You can find the installer in the Applications folder or in Launchpad.
- Insert a USB stick into one of the available USB ports on your Mac.
- Open the Terminal application from the Utilities Folder.
Once Terminal is open, you’ll need root access. Type the following command and enter your password when prompted:
sudo /Applications/Install\ OS\ X\ El\ Capitan.app/Contents/Resources/createinstallmedia –volume /Volumes/Untitled –applicationpath /Applications/Install\ OS\ X\ El\ Capitan.app –nointeraction
The path in the command depends on the version of MacOS you’re using. In this example, we’re using the path to create a bootable USB image of El Capitan, just in case there are issues with the current Sierra installation. It will take some time to copy the MacOS to your USB stick, so be patient.
If everything goes according to plan, you should see a message in Terminal saying “Copy Complete.” You’re done! Now, reboot your computer with the USB stick inserted into an empty USB port. As your Mac starts up, hold the “Option” key on your keyboard and select the USB stick to boot from. Let me know if it works for you!
