How to Easily Transfer and Safeguard Your iPhone Photos to Your Mac
Hey there! Are you tired of manually transferring and backing up your precious iPhone photos to your Mac? Well, I’ve got some exciting news for you. I’m here to show you an effortless way to automatically transfer and protect your photos. Let’s get started!
First things first, we need to set up a seamless connection between your iPhone and your Mac. You can do this by enabling the iCloud Photos feature on both devices. By doing so, you’ll ensure that every photo you take on your iPhone will be automatically uploaded to iCloud and become instantly available on your Mac.
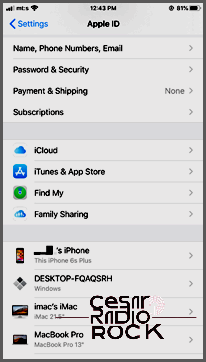
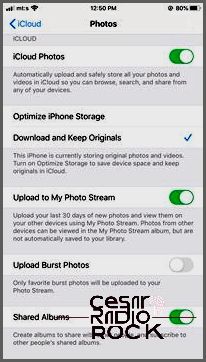
To enable iCloud Photos on your iPhone, go to Settings, tap on your name, then select iCloud. From there, tap on Photos and toggle on the iCloud Photos option. You’re all set on the iPhone side!
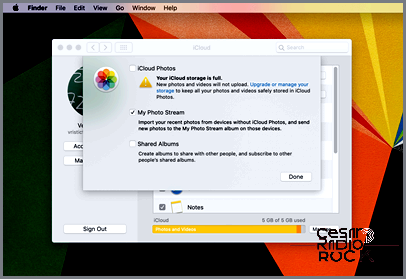
Now, let’s jump over to your Mac. Open your Photos app and go to the Preferences menu. In the iCloud tab, make sure the checkbox next to “iCloud Photos” is ticked. This will enable the synchronization of your iPhone photos with your Mac.
But wait, what about backing up your photos? We don’t want to rely solely on iCloud, do we? Of course not! It’s always wise to have an extra layer of protection for your precious memories. So, let’s set up a local backup on your Mac.
Connect your iPhone to your Mac using a Lightning cable. Your Mac should recognize the iPhone and prompt you to allow access. Grant permission, and your Photos app will open automatically.
Once the Photos app launches, you’ll see your iPhone listed on the left-hand side under “Devices.” Click on it, and a whole new world of options will open up.
Here’s where the magic happens. In the top-right corner, you’ll find a checkbox labeled “Import all new photos.” Check it, and your Mac will automatically import any new photos from your iPhone whenever it’s connected.
But hey, what if you only want to import specific photos? No worries! Just below the checkbox, you’ll see “Review for Import.” Click on it, and you’ll be able to select the photos you want to transfer.
Now that your photos are safely transferred to your Mac, it’s time to explore the wonders of organization. The Photos app has a plethora of features to help you organize your memories effortlessly.
Take advantage of the built-in smart albums that automatically group your photos by criteria like date, location, and even facial recognition. You can also manually create albums to keep your photos neat and tidy.
And don’t forget about the powerful search capabilities of the Photos app. Need to find that one photo from your trip to the beach? Just type “beach” in the search bar, and voila! The app will filter your photos accordingly.
There you have it! With just a few simple steps, you can now automatically transfer and safeguard your iPhone photos to your Mac. Say goodbye to the manual hassle and hello to effortless photo management. Enjoy capturing and preserving your precious moments!

One of the great things about Apple’s ecosystem is that it lets you easily transfer photos from your iPhone to your Mac. But here’s the catch – the fully automatic transfer and backup is only available through iCloud.
However, there are certain native apps that allow you to do it manually. But in this article, I will focus on automatic transfers, with the addition of two manual methods. So keep reading to learn more.
iCloud Storage
The only truly automatic transfer and backup method is through iCloud storage. By default, your iPhone is set to move all new photos and videos to iCloud. The best part is that any edits or changes you make to the photos also get synced to the Cloud.
But there’s a catch – you only get 5GB of free storage, which gets used up quickly. If you don’t purchase more storage, you’ll have to manually download the photos from iCloud to your Mac.
Important Notes
First things first, make sure that both your Mac and iPhone have the latest software update. Then, set up iCloud on all your devices and sign in with the same Apple ID. Don’t forget, a Wi-Fi connection is necessary, but you don’t have to be on the same network for this trick to work.
Setting Up iCloud Photos
To get started, open the Settings app on your iPhone, tap on your name, and then choose iCloud.

To turn on iCloud Photos, simply tap the button next to it. It’s easy! If you want to make sure all your photos are backed up, you can also toggle on the “Upload to My Photo Stream” option. This nifty feature collects and saves photos from all your Apple devices. How convenient is that? Now you can keep all your precious memories safe and secure.

Alright, it’s time to switch over to your Mac. Open up your System Preferences and find the iCloud section.
Now, look for the Options button right beside Photos and give it a click or tap. From there, go ahead and select iCloud Photos.

What You Need to Know
If you turn on iCloud Photos after syncing your images with iTunes, you’ll see a message that says “Photos and Videos Synced from iTunes will be Removed.” Don’t worry though, because the photos that have been backed up on your computer will still stay there. They’ll only be removed from your iPhone.
When you turn on iCloud Photos on your Mac, it will automatically upload the images to iCloud. This means you can access them on any of your iOS devices as long as you log in with the same Apple ID.
Transfer Photos Manually
If you want to transfer photos manually, you’ll need a USB Type-C cable. The methods listed below use the built-in macOS apps.
The Photos App
This is the easiest and quickest way to transfer photos. Just follow the steps below:
Step 1: Connect Your Mac and iPhone
Grab your USB cable and connect your Mac and iPhone. The Photos app should automatically launch when you connect the two devices. If it doesn’t, you can open the app using the Dock or Launchpad.

Note: To transfer photos from your iPhone to your Mac, make sure your iPhone is unlocked. You may see a pop-up window asking for access to your device. Just tap or click “Trust This Computer” to proceed.
Step 2
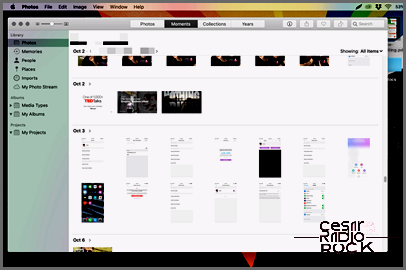
Once the connection is made, you’ll find your iPhone listed under “Devices” in the Photos menu on the left. Simply click on your phone, and your Camera Roll images and videos will instantly appear.
Step 3
To upload all your images, select “Import All New Photos”. Alternatively, you can choose specific images and upload only those. There’s even an option to automatically delete the photos from your iPhone after transferring them to your Mac.
Tip: By default, the Photos app will open automatically when you connect your devices. If you prefer, you can disable this feature by unchecking the “Open Photos for This Device” option in the Photos app.
The Image Capture App
The Image Capture app has been around since before the first iPhone. Originally designed for transferring images from third-party devices, it remains a reliable option for backing up and organizing your iPhone photos on a Mac. Here’s how you can use it:
Step 1
Connect your iPhone to your Mac and open Image Capture. Once again, your iPhone will appear under “Devices”, and you’ll see a list of all your photos.

One great thing about using Image Capture is that it gives me detailed information about each image.
Step 2
To transfer the images, simply select the destination folder next to “Import to” and choose the images you want to move. There’s also an option to “Import All”, and you can adjust the thumbnail preview size by sliding the slider beneath the import button.
Preserve Your Family Album
As you can see, it’s easy to automatically transfer and back up your iPhone images to your Mac. The manual methods are also quite useful, and there are even some third-party apps available for automatic image transfers.
Which of these methods do you find most helpful? Do you store any other files in your iCloud account? Share your thoughts in the comments section below.
