Create Your Own Torrent Server with Deluge on a Raspberry Pi
Downloading torrents is already easy on any computer, but have you ever considered setting up a dedicated torrent server? There are a couple of great reasons why it’s worth the extra effort.
First of all, with a dedicated server, you can access your torrents from anywhere on your network. Whether you’re using a laptop in a different room or managing your downloads while away from home, the server gives you flexibility and convenience.
Another benefit is that you can keep your downloads running even when your computers are turned off. Your server will continue to work in the background, ensuring that your progress is never interrupted.
Managing a server is also much simpler. You don’t have to worry about other programs interfering or causing crashes. Plus, depending on your network setup, a server can reduce the number of VPN connections you need to worry about.
What You’ll Need
Surprisingly, you don’t need much for this project. All you need is a Raspberry Pi and a few essential accessories:
- Raspberry Pi 3 or a newer model
- External hard drive or networked drive
- Ethernet cable
- Power cord for the Pi
- MicroSD card with a capacity of 16GB or more
Getting Started: Flashing the SD Card
The default operating system for a Raspberry Pi is Raspbian, and it’s perfect for setting up a torrent server on the Pi. Start by visiting the Raspberry Pi Foundation’s download page and get the latest release of Raspbian Lite. Since you won’t need a desktop environment for your server, a lighter version is ideal.
Once you have downloaded the image, unzip it. You should have a raw .img file. Insert your MicroSD card into your computer.
If you don’t have a tool for flashing images to SD cards, you can use Etcher. It’s a cross-platform application that works on any operating system. Download the appropriate version for your OS.
After installing Etcher, open it and select your image file in the first section. Then, locate your SD card. Once everything is set, click the button to start the flashing process. It may take a while, so be patient.
Once Etcher has finished writing the image, there’s one more step. Mount your MicroSD card on your computer and look for the “boot” partition. In the base of this partition, create a blank file called “ssh”. This file will enable SSH access on the Pi by default.
Installing Raspbian
Unmount your SD card and remove it from your computer. Insert it into the Pi and connect the Pi directly to your router using an Ethernet cable. When everything is ready, plug in the power cord.
The Pi will take some time to resize its partitions and fill up the SD card. While it’s doing that, open your web browser and go to your router’s web interface. Keep an eye on the list of connected devices, and eventually, the Pi will appear as “raspberry”.
Once you see the Pi on your network, you can use SSH to connect to it. Open up the OpenSSH application and enter the Pi’s IP address. The username is “pi” and the password is “raspberry”.
$ ssh pi@192.168.1.110
Creating a User Account
You might want to create a new user specifically for Deluge. This user will run Deluge as a service daemon and not have much other functionality.
$ sudo groupadd deluge
$ sudo -r –home-dir /var/lib/deluge -g deluge deluge
Create a directory for the Deluge user and grant ownership:
$ sudo mkdir /var/lib/deluge
$ chown -R deluge:deluge /var/lib/deluge
Setting Up a VPN Connection (Optional)
While not strictly necessary, it’s highly recommended to connect to a VPN for added security. The process may vary depending on your VPN provider, but the general steps are similar. Start by installing OpenVPN on Raspbian:
$ sudo apt install openvpn
Next, download the OpenVPN configuration files from your VPN provider. Look for files with the .ovpn extension. Usually, these files are provided as part of a .zip file.
Choose a location for your VPN server. It’s a good idea to pick a server outside of the US for certain needs. Copy the chosen configuration file to the system’s OpenVPN folder and rename it:
$ sudo cp Downloads/config.ovpn /etc/openvpn/client.conf
Now, create a file for authentication called “auth.txt” with your VPN account username on the first line and your password on the second line. Open the VPN configuration file you copied earlier and add the line below, replacing “auth.txt” with the correct path to your authentication file:
auth-user-pass auth.txt
Next, add the following block just before your certificates in the VPN configuration file. This block handles logging and starting/stopping the service:
status /etc/openvpn/openvpn-status.log
log /etc/openvpn/openvpn.log
script-security 2
up /etc/openvpn/update-resolv-conf
down /etc/openvpn/update-resolv-conf
Save the file, exit, and restart the service:
$ sudo systemctl restart openvpn
$ sudo systemctl start openvpn@client
$ sudo systemctl enable openvpn@client
Creating a VPN Killswitch (Optional)
If you’re using torrents behind a VPN, it’s a good idea to have a reliable killswitch that will disconnect you from the internet if you lose contact with the VPN. On Linux systems, this is easily achieved with a firewall. Start by installing UFW to simplify firewall management:
$ sudo apt install ufw
Once UFW is installed, you can start setting up your firewall rules. Begin by disabling UFW:
$ sudo ufw disable
Next, set UFW to block all traffic by default:
$ sudo ufw default deny incoming
$ sudo ufw default deny outgoing
Allow connections from your computer and the local network:
$ sudo ufw allow from 192.168.1.0/24
$ sudo ufw allow from 127.0.0.1
Then, allow all traffic through your VPN interface (check the actual interface name with the “ifconfig” command):
$ sudo ufw allow in on tun0
$ sudo ufw allow out on tun0
Finally, allow communication with your VPN’s DNS server (check the actual IP in /etc/resolv.conf):
$ sudo allow in 53
$ sudo allow out 53
When you’re ready, re-enable UFW:
$ sudo ufw enable
Installing Deluge
Now, it’s time to install Deluge on your server. Run the following command:
$ sudo apt install deluged deluge-console
Wait for the installation to finish; it should be quick.
Setting Up the Deluge Server
To allow connections to your server from other computers, you need to enable remote access. Switch to your Deluge user and open the Deluge console:
$ sudo su deluge
$ deluged
$ deluge-console
Once in the Deluge console, execute the following command to enable remote connections:
config -s allow_remote True
Now, stop the Deluge daemon by finding its process ID and killing it:
$ ps aux | grep deluge
$ kill 1923
Add user login records to the authentication file located at /var/lib/deluge/.config/deluge/auth. The format is:
username:password:10
The number denotes the privileges, with 10 indicating an admin user. Once you’re done, save and exit.
Creating a Deluge Service

Since you want Deluge to start automatically with the Raspberry Pi, you’ll need to create a simple systemd service. But don’t worry, the Deluge documentation actually provides the code for it. Just create a file at /etc/systemd/system/deluged.service and put the following code in it:
[Unit]
Description=Deluge Bittorrent Client Daemon
Documentation=man:deluged
After=network-online.target
[Service]
Type=simple
User=deluge
Group=deluge
UMask=007
ExecStart=/usr/bin/deluged -d
Restart=on-failure
# Time to wait before forcefully stopped.
TimeoutStopSec=300
[Install]
WantedBy=multi-user.target
Now, let’s test it out. Start the service and check its status by running the following commands:
$ sudo systemctl start deluged
$ sudo systemctl status deluged
If the service is up and running, you can make the change permanent by enabling the service:
$ sudo systemctl enable deluged
Now, let’s move on to installing the Deluge client to connect to your server. Deluge is an open-source and widely available client that works on multiple platforms.
First, let’s talk about the installation process for Windows users.
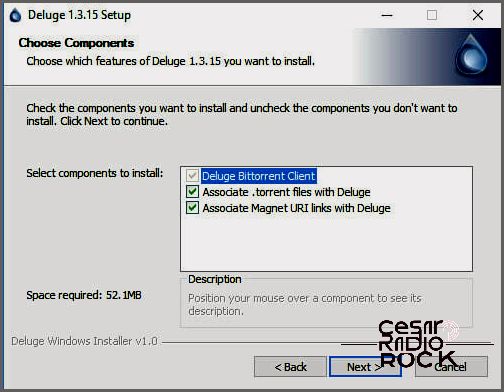
Hey there! Let me walk you through the process of downloading Deluge and connecting to your server. First things first, if you’re using Windows, head over to the Deluge download page and snag the latest release. Once you’ve got it, simply run the .exe file and follow the installation wizard. Don’t worry, it’s pretty straightforward, so feel free to click through and accept the default settings.
Linux
If you’re rolling with Linux, good news! Installing Deluge is a piece of cake. Just use your trusty package manager to get the client up and running.
$ sudo apt install deluge-gtk
Now, Let’s Connect
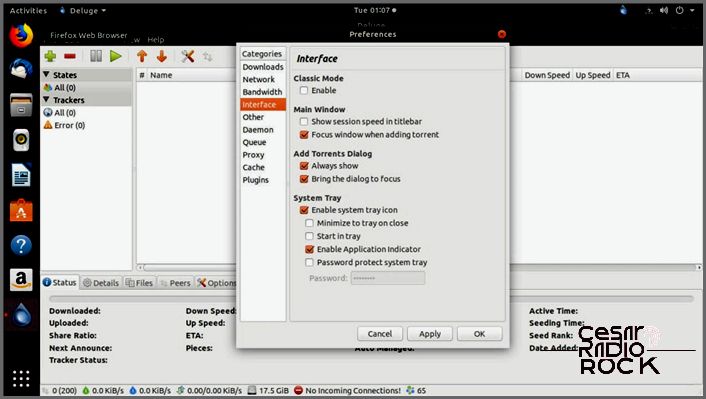
Hey there! Let’s get into the nitty-gritty of adjusting your Deluge preferences, shall we? First things first, we need to open up the preferences menu. You can do this by clicking on “Edit” and then selecting “Preferences.” Easy peasy so far, right?
Now that the preferences window is open, you’ll notice a few tabs on the side. Look for the one that says “Interface” and give it a click. We’re getting closer to our destination!
Okay, now that we’re in the “Interface” tab, let’s focus our attention on the top part of the window. There’s a neat little checkbox hanging out there, and it’s in charge of Deluge’s classic mode. To switch things up a bit, you’ll want to uncheck that box. That’s right, untick it!
And voila! By following these simple steps, you’ve disabled Deluge’s classic mode. Congratulations! Now you can enjoy a fresh new perspective on your Deluge experience. Happy tweaking!
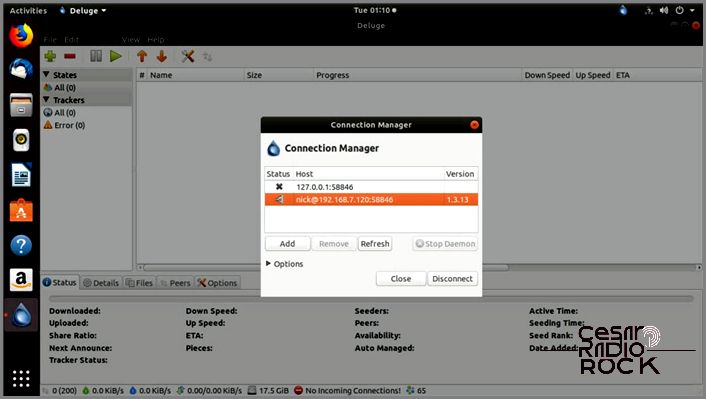
Hey there! Just click on the “Edit” button one more time. This time, select “Connection Manager.” When you first open it up, you’ll see your localhost IP listed there. Below that, you’ll notice some buttons that let you add or remove connections. Cool, right? Now, go ahead and click the “Add” button. In the “Hostname” field, type in your server’s IP address. Don’t worry about changing the port number. Just leave it as is. Next, fill in the username and password that you set up. Once you’re done, click “Add” and you’re good to go!
Now, let’s head back to the main “Add” window. You should see your new entry highlighted. To connect to the server, simply click on the “Connect” button at the bottom. Easy peasy!
Time to Set Up Your Storage
Before you start downloading anything, we need to get your storage set up. You have two options: an external USB hard drive or a networked drive. Either one will work just fine. The main thing is that it needs to be bigger than what the Raspberry Pi can handle.
USB Drive
Plug in your USB drive to the Pi. Then, open up your SSH console and take a look at the available devices.
$ ls /dev grep sd
You should see the USB drive and maybe your SD card. The SD card will have multiple partitions, while the USB drive will probably only have one. It’ll look something like this:
sda sda1 sda2 sdb sdb1
In this case, the external drive is sdb, and the partition is sdb1. Let’s create a directory to mount it to.
$ sudo mkdir /media/external
Now, let’s open up /etc/fstab with your trusty text editor. We need to create an entry so that the drive automatically mounts when you boot up.
/dev/sdb1 /media/external ext4 defaults,user,exec 0 0
Make sure the path and filesystem type match your drive. If you’ve only used the drive with Windows before, it’s probably NTFS. In that case, you’ll need to install ntfs-3g on the server.
Almost done! Now, just run the following command to mount the drive.
$ sudo mount -a
Networked Drive
Every networked drive setup is a little different, but let’s say you’re using a Linux NFS drive. Start by creating a directory to mount it to.
$ sudo mkdir /media/nfs
Then, open up fstab and add your drive.
192.168.1.120:/media/share /media/nfs ext4 defaults,user,exec 0 0
Save and exit. Now, let’s mount that drive.
$ sudo mount -a
Time to Configure Deluge
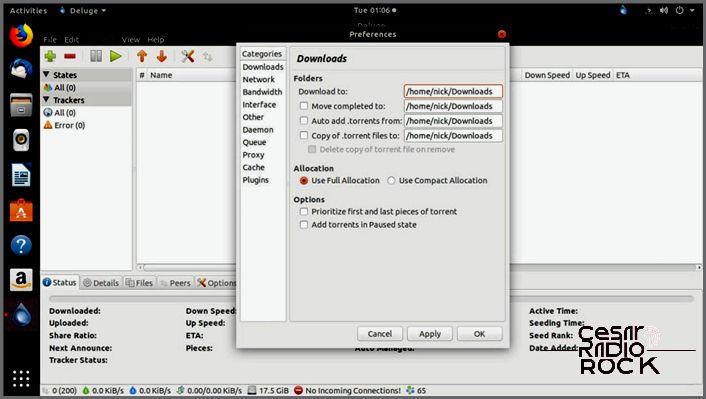
When you’re using the Deluge client, you have the option to choose where your torrent downloads go. Just click on “Edit” and then “Preferences.” In the “Downloads” tab, you can specify the folder where you want your files to be saved. Simply select the location of your newly mounted drive.
How to Download a Torrent
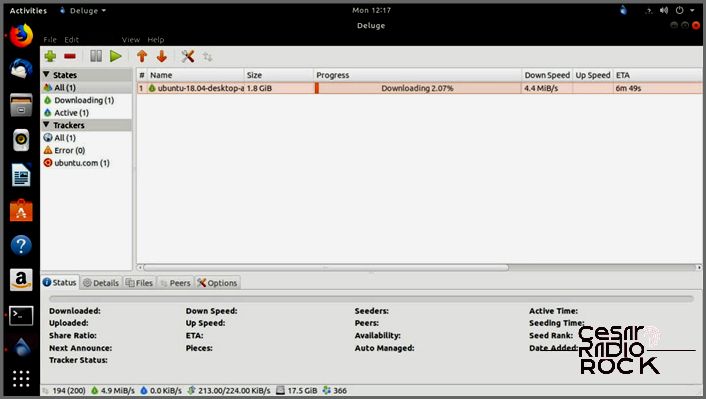
If you want to download a torrent using Deluge, here’s what you need to do:
First, look at the top left corner of the window and find the plus sign icon. Give it a click. This action will open a new window that provides various options for adding a torrent.
Now, there are two common ways to add a torrent. The first one involves using a torrent file. If you have a torrent file saved on your computer, simply click the button that allows you to browse your computer. This will let you select the location of the torrent file you want to download.
The second option involves using a URL. In this case, click on the URL button. Then, paste the URL into the provided space. This way, you can add a torrent by using a URL. Oh, and don’t worry, this method also works for magnet links!
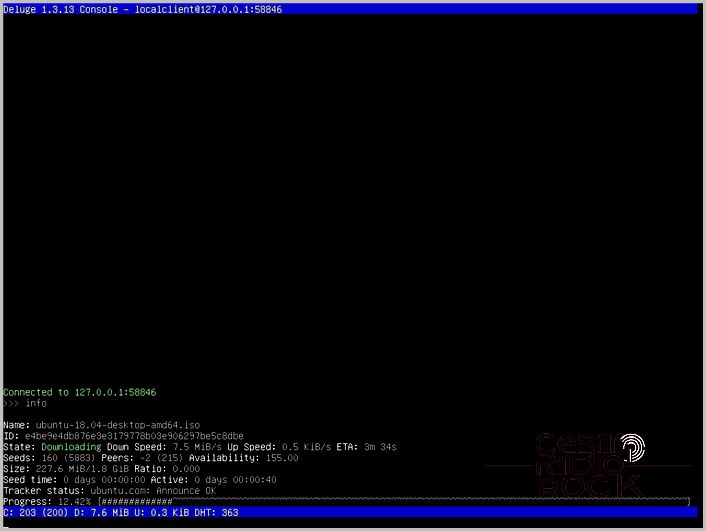
When you add a new torrent to Deluge, it will show up in the main window. This is where you can keep an eye on its progress. If you want to change the priority of your torrents, just right-click on them and use the “Queue” option to move them up or down.
Right-clicking on a torrent gives you access to other options as well. You can set download and upload limits, and even pause a torrent if you need to. There’s also the option to remove a torrent, without deleting the downloaded file. This way, you can stop seeding. But of course, if you want to keep seeding, you can also control the network usage of those completed torrents.
Final Thoughts
Now you have a fully functional torrent server that’s all set up for downloading and seeding as many torrents as you want. The server will keep running even when your computers are turned off. Plus, you have the added privacy and security of running through a VPN. So go ahead and enjoy your new torrenting experience!
