Connecting Your Roku to Dorm Wi-Fi Made Easy
Hey there! Want to know how to get your Roku connected to the Wi-Fi in your dorm? I’ve got you covered! Follow these simple steps, and you’ll be streaming your favorite shows in no time.
First things first, make sure you have your Roku device and remote handy. Then, let’s dive right in!
Step 1: Find the Right Wi-Fi Network
When you turn on your Roku, go to the ‘Settings’ menu and select ‘Network’. From there, choose ‘Wireless’ and look for your dorm’s Wi-Fi network in the list. Once you find it, click on it and enter the password if prompted. Easy peasy, right?
Step 2: Register Your Device
Some dorms require you to register your device before it can connect to the Wi-Fi. If that’s the case, don’t worry. Just follow the instructions provided by your dorm’s IT department to register your Roku. They’ll give you the necessary codes or login details you need during this process. Trust me, it’s a piece of cake!
Step 3: Update Your Roku
Now, it’s time to ensure your Roku is running the latest software. To do this, go to ‘Settings’ and select ‘System’. Then, click on ‘System update’ and let your Roku do the rest. It might take a few minutes, but it’s totally worth it to have the best streaming experience possible.
Step 4: Enjoy Streaming!
Alright, my friend, you’re all set! Your Roku is now connected to your dorm Wi-Fi, and you’re ready to start streaming your favorite movies, TV shows, and more. Grab that popcorn and get cozy, because your streaming adventure is about to begin.
Remember, if you ever run into any issues or have questions, don’t hesitate to reach out to your dorm’s IT support. They’re there to help you out.
Now go ahead, enjoy your Roku, and happy streaming!

Roku streaming devices are super popular. They let you watch all kinds of Roku-compatible content whenever you want, as long as you’re connected to a TV. One awesome thing about the Roku Stick is that you can take it with you wherever you go. That’s why it’s perfect for hotels and dorms.
Now, let me tell you how you can make the most out of your Roku in hotels and dorms.
Connecting in Hotels and Dorms
Hotel and Dorm Connect is a special feature on Roku Sticks and Media Players. It lets you stream Roku content using the internet, even when you’re not at home. But what’s the difference between Hotel and Dorm Connect and regular Roku at home?
Well, when you connect to a public network, you have to log in using a web browser. Hotel and Dorm Connect makes it easy for you to authenticate the connection using your computer, smartphone, or tablet. This is really handy when you’re on the go, especially if you have a Roku stick.

What You Need
Roku Sticks are like regular flash drives in terms of size, shape, and appearance. They were designed with portability in mind, so you can easily fit them in your pocket and take them anywhere.
However, it’s not that straightforward. To make a Roku Stick or Roku Media Player work in any hotel room or dorm with an HDMI-equipped TV and internet connection, you need to bring along a few components. These include a power adapter, a Roku TV remote, and an HDMI cable if you’re not using the Streaming Stick. Fortunately, all this gear can fit in your backpack or even your jacket pockets.
As mentioned earlier, the Hotel and Dorm Connect feature lets you skip using a web browser to log into your account. Instead, you can use your laptop, computer, or smartphone for this purpose.
Using the Hotel and Dorm Connect feature on your portable Roku device may not be as simple as plugging in the stick, but it doesn’t require a lot of effort, and these devices won’t take up much space in your bag.
Using the Hotel and Dorm Connect Feature
Now that you know what you need to bring, let’s dive into how to activate and use the feature. First, make sure your dorm or hotel room has a smart TV. Some TVs may not be compatible with Roku devices, but don’t worry. The solution is simple: if the TV has an HDMI input (not just an output), it is Roku-compatible.
Next, plug the Roku Stick or Media Player into the power socket using the included power adapter. Locate the HDMI input port(s) on the hotel or dorm TV, choose one, and plug in your Roku device. Turn on the TV and use the TV remote to select the correct HDMI port. Once you’ve done that, the Roku logo should appear on the screen.
Once everything has loaded properly (which may take a while the first time), grab your Roku remote and press Home. Then, go to Settings and find the Network option. Select it and choose Set up connection. Finally, select Wireless.
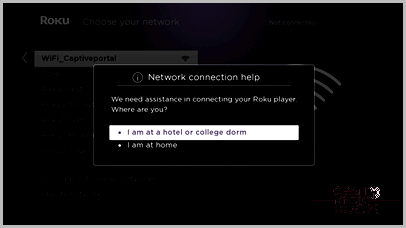
A list of available networks will appear. Select the one you have access to. An onscreen prompt will then appear with two options: I am at a hotel or college dorm and I am at home. Choose the former option, of course.

Alright, grab your smartphone and head over to the Wi-Fi settings. Make sure you’re connected to the same network as your Roku device. Now, use your laptop or smartphone to connect to the Roku link that’s displayed on your TV screen. Enter the password that’s shown on the screen.
If there’s any additional information required, like entering details on your laptop or smartphone browser, go ahead and do that.
Once you’re done, you’ll be taken back to the Network menu and your Roku device will work normally. When you’re ready to disconnect, simply remove the Roku device from your TV.
Roku, Hotels, and Dorms
It’s clear that the folks at Roku have considered the needs of travelers and college students. This is one of the reasons why Roku has become a leader in the world of streaming players. Despite the initial confusion, using the Hotel and Dorm Connect feature is actually really simple and straightforward.
Have you ever tried using your Roku device in a dorm or hotel room? We’d love to hear about your experiences! Share your story in the comments section below.
