Clearing Apple Music Cache on Windows, Android, iPhone, and Mac: A Step-by-Step Guide
Hey there! In this guide, I’ll walk you through the process of clearing the cache for Apple Music on different devices like Windows, Android, iPhone, and Mac. It might sound a bit technical, but don’t worry – I’ll make it super simple for you to follow along.
Clearing the cache is important because it helps to free up storage space and ensures that Apple Music runs smoothly. So, let’s get started!
Clearing Apple Music Cache on Windows
If you’re using Apple Music on a Windows computer, here’s how you can clear the cache:
- First, open iTunes on your Windows computer. You can find it in your Start menu or by searching for it.
- When iTunes is open, go to the menu bar at the top and click on “Edit”.
- From the drop-down menu, click on “Preferences”.
- A new window will pop up. Click on the “Advanced” tab at the top.
- Under the “Reset Cache” section, click on “Reset Cache” button.
- A confirmation window will appear. Click on “Reset Cache” again to confirm.
That’s it! The cache for Apple Music on your Windows computer has been cleared. Now you can enjoy a smooth and clutter-free music experience.
Clearing Apple Music Cache on Android
For those using Apple Music on an Android device, follow these steps to clear the cache:
- On your Android device, open the “Settings” app.
- Scroll down and tap on “Apps” or “Applications”.
- Find and tap on “Apple Music” from the list of apps installed on your device.
- On the Apple Music app info screen, tap on “Storage”.
- Now, tap on “Clear cache” or “Clear storage”, depending on your Android version.
- You may be asked to confirm your selection. Tap on “OK” or “Clear” to proceed.
Great job! You have successfully cleared the cache for Apple Music on your Android device. Now you can enjoy a smooth and optimized music experience.
Clearing Apple Music Cache on iPhone
If you’re an iPhone user, here’s how you can clear the cache for Apple Music:
- On your iPhone’s home screen, tap on “Settings”.
- Scroll down and tap on “Music”.
- Under the “Downloads” section, tap on “Media Library”.
- Next, tap on “Reset Media Library”.
Well done! The cache for Apple Music on your iPhone has been successfully cleared. Get ready to groove to your favorite tunes without any interruptions.
Clearing Apple Music Cache on Mac
For Mac users, follow these steps to clear the cache for Apple Music:
- Open the Apple Music app on your Mac.
- In the menu bar at the top, click on “Music” and then select “Preferences”.
- A new window will appear with multiple tabs. Click on the “Advanced” tab.
- Under the “Reset Cache” section, click on “Reset Cache” button.
- Confirm your action by clicking on “Reset Cache” again in the pop-up window.
Fantastic! The cache for Apple Music on your Mac has been cleared. Now you can enjoy a flawless music streaming experience.
By following these simple steps, you can ensure that Apple Music runs smoothly on your devices. Clearing the cache regularly will help keep your devices optimized and ensure that you have enough storage space for all your favorite tunes. Happy listening!

Do you use Apple Music to listen to your favorite songs? If you find that the app starts slowing down or stuttering after using it for a while, there may be a problem with the app’s cache. It’s possible that the Apple Music cache is taking up a lot of space on your phone or computer due to a bug or caching issue. Thankfully, you can fix these issues by clearing the app’s cache.
In this guide, I’ll show you how to clear the Apple Music cache on Windows, Android, iPhone, and Mac.
How to Clear Apple Music Cache on Windows
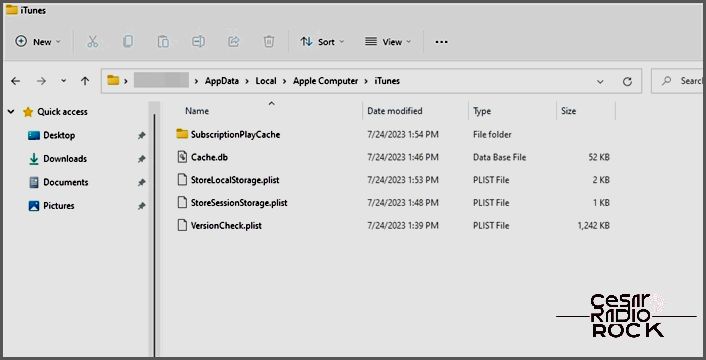
To clear the Apple Music cache on Windows, you’ll need to go into the AppData folder on your PC and delete some files. Don’t worry, the steps are easy to follow. Just keep in mind that the instructions below are for iTunes, not the official Apple Music app for Windows.

- To open the Windows Run prompt, press Win + R.
- Type C:\Users\”USERNAME”\AppData\Local\Apple Computer\iTunes\ in the Run prompt (replace “USERNAME” with your Windows user name).
- Press Enter to open the iTunes folder.
- Right-click on the fsCachedData and SubscriptionPlayCache folders, then select Delete from the context menu.
- Restart iTunes to reload everything.
How to Clear Apple Music Cache on Android
Clearing the Apple Music cache on Android is easy.
Clear Apple Music App storage cache
You can clear the Apple Music App storage cache on your Android device.
- Open the Settings menu on your Android phone.
- Select Apps & Notifications.
- Choose Apps and then go to Apple Music.
- Select Storage.
- Tap Clear Cache.
If you’re not happy with Apple’s music streaming service, consider canceling your Apple Music subscription.
How to Set Apple Music Cache Playback Limit on Android
In addition to clearing the cache, you can set a playback cache limit for Apple Music on Android.
- Open the Apple Music app.
- Click on the three lines at the top right.
- Go to Settings.
- Select Playback Cache.
- Choose your desired cache size limit.
If you don’t want to depend on the cache limit, you can download all the songs on Apple Music. Downloaded songs don’t count against your playback cache.
How to Clear Apple Music Cache on iPhone
Unfortunately, clearing the Apple Music cache on your iPhone is limited. You can only delete and reinstall the app to clear the cache.
- Tap and hold on the Apple Music icon.
- From the drop-down menu, select the Remove App option.
- When the pop-up asks if you want to remove the app, select Delete App.
- Go to the App Store.
- Search for Apple Music, download it, and configure it again.
How to Clear Apple Music Cache on Mac
Clearing the Apple Music cache on Mac is a bit more challenging than on Windows, but it can still be done.
- Open Finder.
- Click on the Go tab.
- Select Go to Folder from the drop-down menu.
- Navigate to Users > Username > Library and press Enter on the keyboard.
- Open the folder with the Caches name.
- Find the com.apple.iTunes folder and right-click on it.
- Click on Move to Bin.
You may need to enter your Mac’s admin password to confirm this action. When you open the Apple Music app on your Mac again, it will rebuild its cache, which may temporarily increase your data usage.
Keep Clearing Apple Music’s Cache Regularly
Apple Music is a popular music streaming app that offers a variety of audio. However, it can quickly accumulate caches, affecting the app’s performance. That’s why it’s essential to regularly clear these caches.
Depending on your device, you can clear the Apple Music caches. While the methods differ for each platform, they are all relatively straightforward.
FAQs
Q. Does Apple Music automatically clear the cache on iPhones?
A. Yes, Apple Music automatically clears the cache on iPhones. However, if this doesn’t happen, you can easily clear it by deleting and reinstalling the app.
Q. Can you set a cache limit for Apple Music on iPhones?
A. Unfortunately, you can’t set a cache limit for Apple Music on iPhones. However, you can do so on Android devices with a few simple steps.
Q. Does clearing the Apple Music cache on Android remove downloaded music?
A. No, clearing the Apple Music cache on Android won’t remove your downloaded music. So there’s no need to worry about losing your favorite songs.
Q. Does Apple Music for Android support lossless audio?
A. Yes, Apple Music for Android supports lossless audio playback. However, you may need wired headphones, receivers, or powered speakers to listen to songs at sample rates higher than 48 kHz. Additionally, an external digital-to-analog converter might be necessary.
