Automatically Adding the Date in Excel
Hey there! Today, I want to show you an awesome trick that will make your life easier when using Excel. I’m going to teach you how to automatically add the date to your spreadsheets. It may sound complicated, but trust me, it’s super simple once you know how.
First things first, you’ll need to open Excel. Create a new spreadsheet or open an existing one, it doesn’t matter. Just make sure you have a cell where you want the date to appear.
Now, pay attention because here comes the magic! In the cell where you want the date, type “=” and then choose the “TODAY” function. This function tells Excel to display the current date.
You might be wondering, how does Excel know what “TODAY” means? Well, it’s like a secret handshake between you and Excel. When you type “TODAY”, Excel understands that you want the current date. Pretty cool, right?
But wait, there’s more! You can actually customize the date format. By default, Excel will display the date as “mm/dd/yyyy”. But if you prefer a different format, you can change it. Just click on the cell with the date, go to the “Format” menu, and select “Number”. From there, you can choose the format that best suits your needs.
Now, let’s talk about the best part. This trick isn’t a one-time thing. Oh no! Excel is smart enough to update the date automatically every time you open the spreadsheet. So you don’t have to worry about manually typing the date every single day. How awesome is that?
One more thing before I go. Sometimes you may not want Excel to update the date automatically. Maybe you want to freeze the date, so it doesn’t change. In that case, instead of using the “TODAY” function, you can use the “CTRL” + “;” shortcut. This will insert the current date as a static value that won’t change.
And there you have it! You’ve just learned how to automatically add the date in Excel. It’s a simple trick that can save you a lot of time and make your spreadsheets look more professional. Give it a try and I bet you’ll never want to go back to manually typing the date again.

Hey there! Do you know that Excel has some awesome features to help you with dates and time in your worksheets?
Imagine having a cell that always updates to the current date when you open the sheet. It’s super handy for documents that need to be printed or saved as a PDF on a specific date, like contracts or invoices.
And get this, you can even create a sheet that lists all the days in a year to help you plan for the future. How cool is that? You can make a 5-year plan or focus on just workdays for a streamlined planning experience. No more wasting time adding hundreds of dates manually. Excel can make it so much easier for you!
But before you dive in, there’s an important thing you need to keep in mind. Excel has specific date formats that you need to follow. If you don’t format your dates properly, Excel might treat them as numbers or plain text, and that can mess up any automation you’re trying to set up. So, let’s make sure we do it right!
The Wonderful World of Date Formats in Excel
When it comes to formatting dates in Excel, there are two sides to the story.
- How you enter the date
- How Excel displays it
Entering the Date
Excel is pretty flexible when it comes to date input. If you enter the date correctly, you’ll see that the cell value is aligned to the right. If it’s aligned to the left, that means Excel thinks your entry is just plain text and won’t apply any date formatting to it. We don’t want that, do we?
Now, let’s say you want to enter July 1, 2019. Well, you can do it in several ways:
- 7/1/19
- 7/1/2019
- 07/01/2019
- 1-jul-2019 or 1-july-2019
- 1 jul 2019 or 1 july 2019
Feel free to use either slashes (7/1/2019) or dashes (7-1-2019). Oh, and by the way, you can also use spaces when entering “1 jul 2019”, but make sure you don’t use spaces like “1 7 2019” because Excel won’t recognize that as a date. And “jul 1 2019” is a no-go for Excel too!
If you’re entering dates for the current year, you can keep it short and sweet with formats like:
- 7/1
- 7-1
- jul 1 or jul-1 or jul/1
- 1 jul or 1-jul or 1/jul
So, if we’re in the year 2019, Excel will automatically recognize these entries as July 1, 2019. Pretty nifty, huh?
But here’s the catch – depending on your computer’s regional settings, the first number might represent either the month or the day. The same goes for the second number. Let’s say you enter 7/1/19, and your settings are for a European country. Excel will assume it’s actually January 7, 2019. So, watch out for that!
Displaying Dates in Excel
Alright, you’ve successfully entered your date. Now, Excel will display it using one of its default formats. If you entered the month, day, and year as numbers (7-1-19 or 07-01-2019), Excel will show the date as “7/1/2019”. Otherwise, as we mentioned earlier, the date will appear as “1-jul” in your sheet.
But what if you want to see the date in a different format? No worries, Excel has got you covered!
Here’s what you can do:
- Right-click on the cell (or a range of cells) you want to format.
- Click on “Format Cells…”.
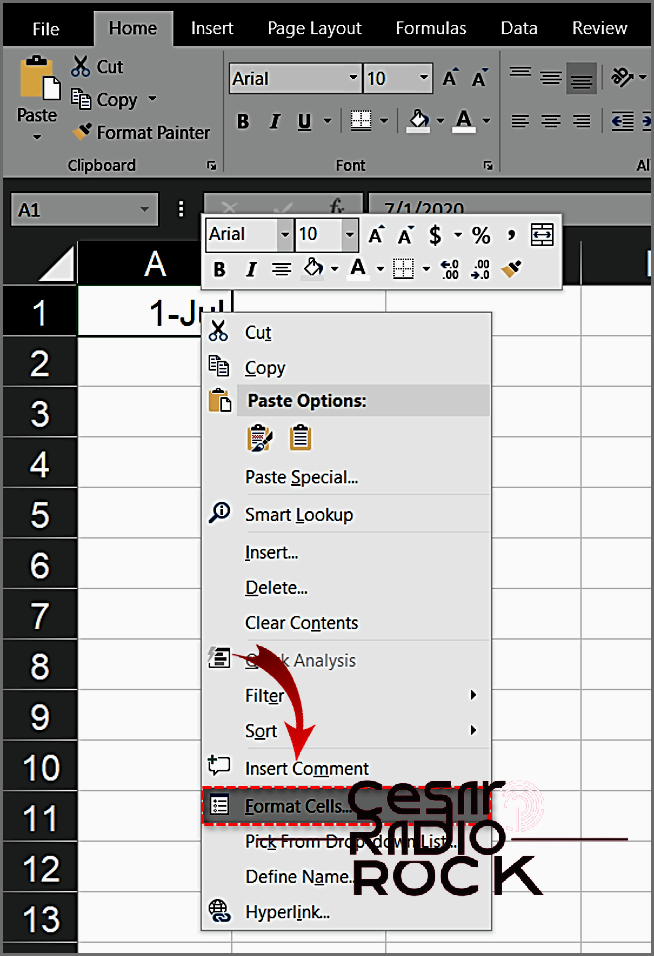
- The “Format Cells” menu will pop up, showing the “Number” tab.
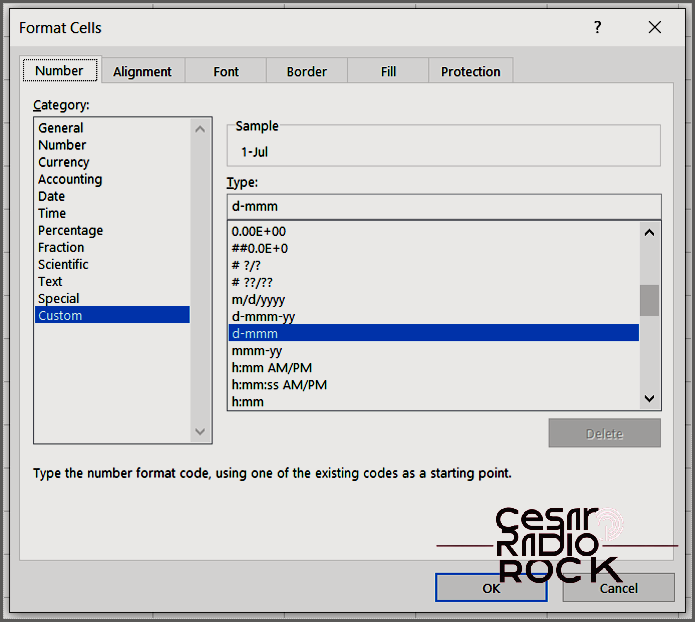
See that category on the left? That’s the “Custom” format, which happens to be Excel’s default format. Here, you can choose one of the suggested formats or create your own. Just type exactly how you want the date to appear in the “Type:” field above the suggested formats list.
Here are some handy guidelines to help you:
- d = 1
- dd = 01
- ddd = Mon
- dddd = Monday
- m = 7
- mm = 07
- mmm = Jul
- mmmm = July
- y or yy = 19
- yyy or yyyy = 2019
Since this is a custom field, you can get creative and type anything you want. Want to show the weekday, date, and some extra text? Easy peasy! Just type something like:
- “Today is” dddd, mmmm dd, “of the year” yyyy.
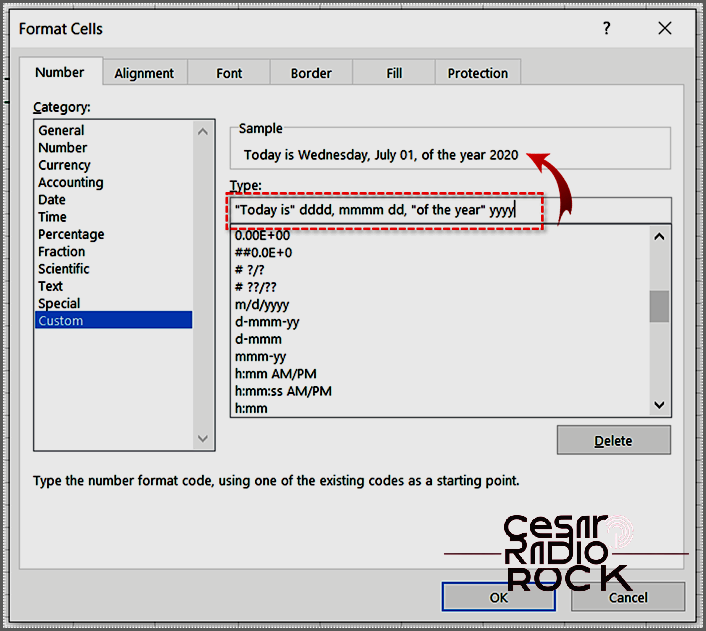
If you’re ever confused about date formats, don’t worry! I got you covered. Just head over to the “Date” category in this menu, where you’ll find a whole range of options to choose from.
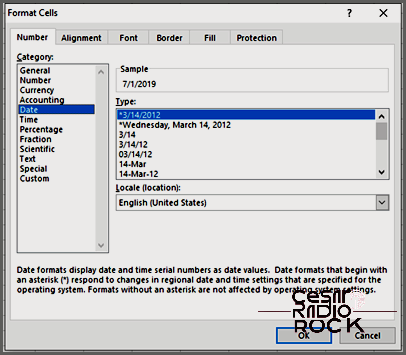
When you choose a format, sometimes the cell gets filled with number signs (#) because it’s not wide enough to display all the characters. To fix this, just double-click the right border of the column header to adjust the cell’s width. You can also drag the border to the right until your date shows up.
Automatically Adding Dates
If you need to add a series of consecutive dates, like a whole week or a month, here’s what you do:
- Start by entering the first date in a cell where you want the series to begin.
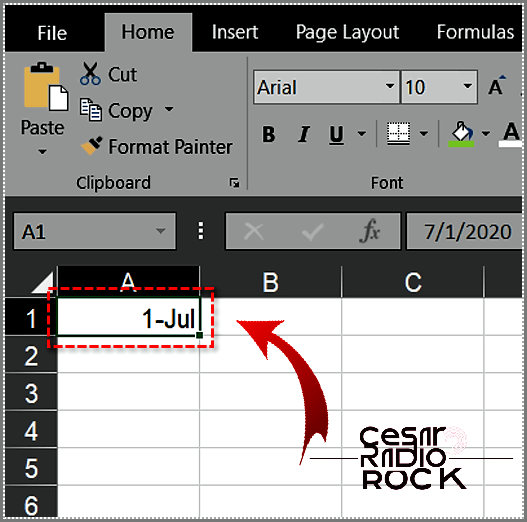
- In the bottom right corner of the cell selection rectangle, you’ll see a small square. That’s the fill handle.
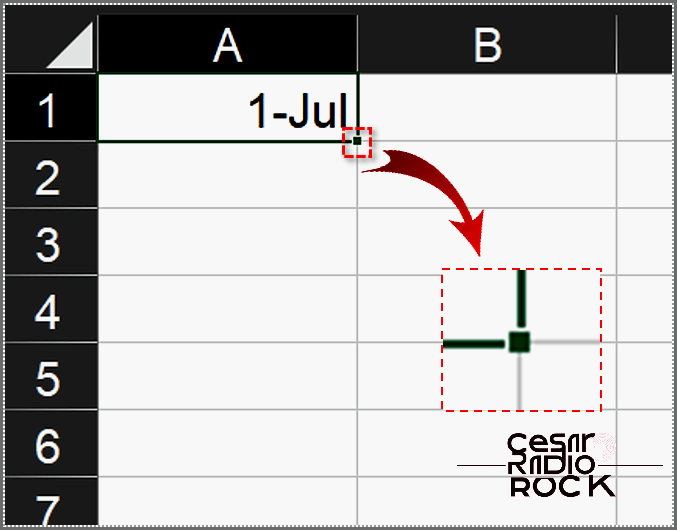
- Click and hold the handle, then drag it across the range where you want the dates to be filled.
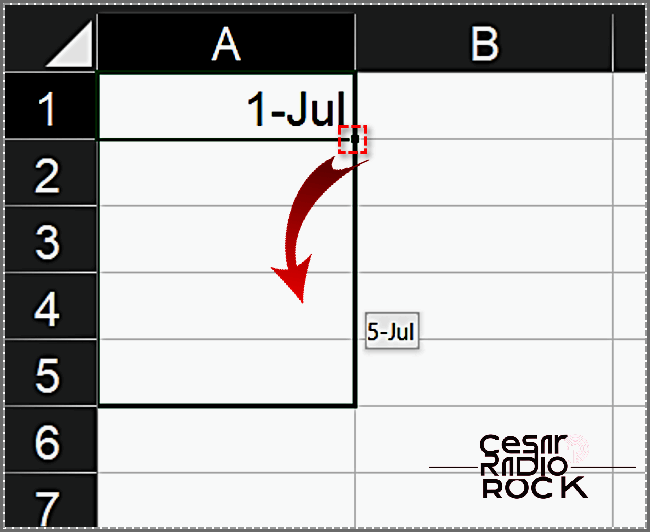
- When you let go, the selected cells will now have consecutive dates filled in.
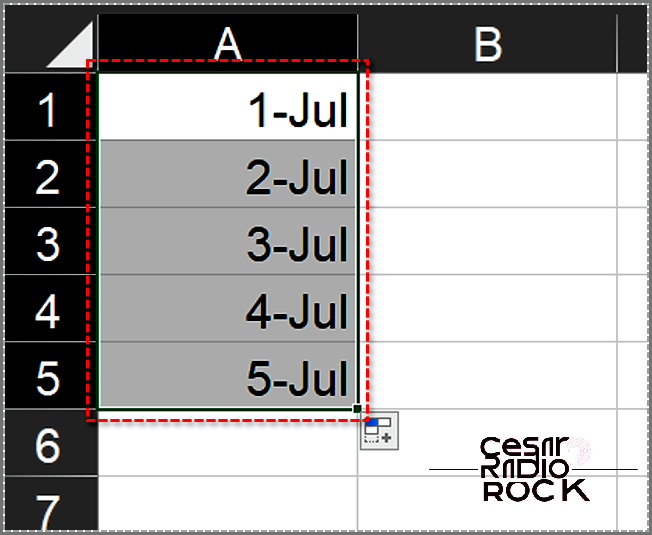
- If you want to continue the series, just select the last cell in the series and drag it until you reach the date you want.

Also, auto-fill works in all four directions. If you drag to the right, the row will fill with dates. If you drag down, the column will fill. If you drag up or to the left, the dates will start going backward.
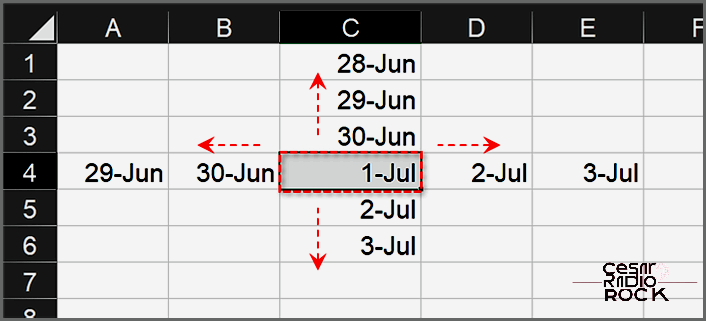
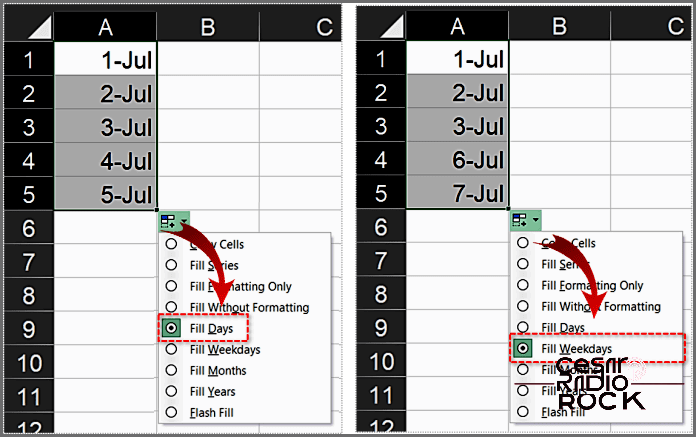
If you want to add dates to your sheet that don’t follow a continuous sequence, like only weekdays, months, or years, you have that option too.
Here’s how you can do it: just repeat the previous steps, but this time, instead of using the left mouse button to drag the fill handle, use the right mouse button. When you let go, a menu will appear, giving you choices to fill the selected cells with days, weekdays, months, or years.
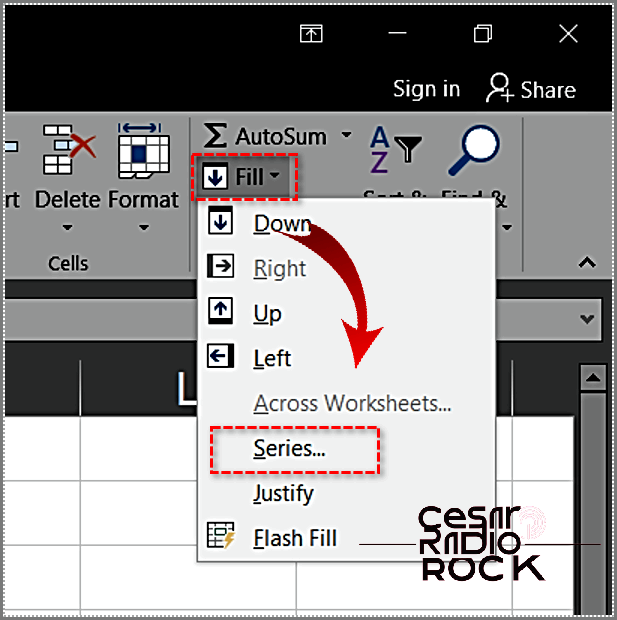
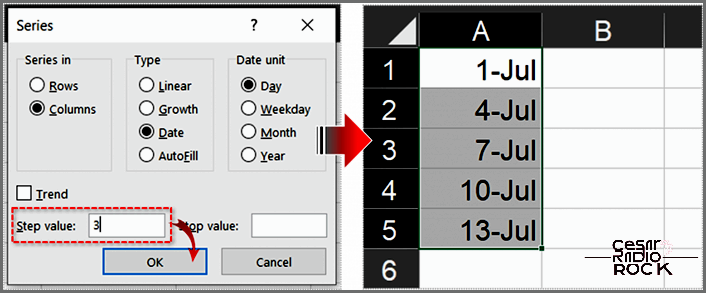
If you want more choices for setting dates automatically, try selecting “Series…” instead of the other options. After dragging the fill handle, go to the Home tab. In the Editing section, choose Fill from the dropdown menu, and then select Series… For instance, if you have an event that happens every three days, set “Date unit” to “Day” and “Step value” to 3.
Adding the Current Date and Time
Hey there! Want to know a quick trick to add the current date and time in Excel without going through the hassle of typing them every time? Well, lucky for you, I’ve got some keyboard shortcuts that can do all the work for you:
- If you want to enter today’s date, just press Ctrl+;
- For the current time, press Ctrl+Shift+;
- If you want to enter both the current date and time, just press Ctrl+; followed by Space and finally Ctrl+Shift+;
By using these shortcuts, your date and time values will remain the same as when you first set them. They won’t change when you recalculate your cells or reopen the sheet later on. Pretty neat, huh?
But let’s say you want the date and time to change every time you open the document. Well, Excel has got you covered with two nifty functions:
- If you want to always have the current date in a cell, simply type =TODAY().
- To update the cell value with the current date and time, type =NOW().
To update these cells without reopening your worksheet, just make any edits in the sheet and the values will automatically update. Easy-peasy!
A Whole Lot of Time Saved
With these handy tricks, you can save loads of time when working with complex worksheets. Instead of manually inserting each date, you can have years’ worth of dates filled in just a matter of seconds. Just remember to enter the initial date in a format that Excel recognizes.
So, did you find these automation tips useful? Got any more tricks up your sleeve that can help in this area? Feel free to share your thoughts in the comments section below!
