Master the Art of Bookmark Organization in Chrome
Oh, the tangled web we weave when bookmarks are a mess! Fear not, my friend, for I have unlocked the secrets to harmonious bookmark organization in Chrome. Let me guide you on this digital journey of bookmark bliss.
Firstly, let’s talk about creating folders to corral your bookmarks. Instead of aimlessly tossing them hither and thither, imagine neatly stacking them into meticulously labeled folders. It’s like having a beautifully organized bookshelf, but in your browser.
To create a folder, simply right-click on your bookmarks bar or click the three-dot menu in the upper-right corner of Chrome. From there, select “Bookmark manager.” Ah, the portal to bookmark heaven! In this magical place, click the three-line menu icon, choose “Add folder,” and give it a meaningful name.
Now that you have your folders ready, let’s populate them with bookmarks like a curator armed with digital treasures. As you stumble upon a webpage you want to save, click the star icon in Chrome’s address bar. A prompt will appear, offering you the chance to assign the bookmark to a folder. Choose the appropriate folder and bask in your newfound organizational prowess.
But what if you’re drowning in a sea of bookmarks and can’t find a specific one? Fear not, for Chrome has a search function tailored just for you. In the Bookmark manager, simply type your desired search term in the search bar, and voila! Chrome will swiftly deliver the bookmark you seek.
Now that you’re a bookmark maestro, let’s touch on a nifty Chrome feature called “Bookmark bar.” This clever space allows you to display your most beloved bookmarks at the top of your browser window. It’s like having a VIP section for your bookmarks, ensuring you never lose sight of your digital gems.
To add a bookmark to the Bookmark bar, right-click on the bookmark or folder you wish to include. Select “Show on Bookmark bar,” and there it shall dwell in all its glory. You can even drag and drop bookmarks within the bookmark bar to arrange them to your heart’s content.
As with any adventure, my fellow bookmarker, safety is key. Ensure your precious bookmarks are backed up, so they may thrive even if the digital winds blow unfavorably. To safeguard your bookmarks, click the three-dot menu, select “Bookmarks,” and choose “Bookmark manager.” From there, click the three-dot menu again, navigate to “Export bookmarks,” and save them to a safe location. Should disaster strike, you can effortlessly import your bookmarks back into Chrome.
Now, as you embark on your bookmark organizing journey, remember: Chrome is your trusty companion, ready to assist you in cataloging the virtual wonders that captivate your mind. May your bookmarks thrive, and may chaos be banished from your digital kingdom. Happy organizing, my friend!
When you start bookmarking the very first page in Chrome, you never know how messy it’s going to get.
We think we’ll only bookmark the important pages, the ones we’ll definitely visit again. But then we keep adding more and more websites to our bookmarks, and soon enough, it becomes a jumbled mess.
Now, there are two types of people – those who do this, and those who decide to organize their bookmarks. If you want to be part of the second group and make the most out of your browser, here’s a guide to help you!
How to Enable Bookmarks
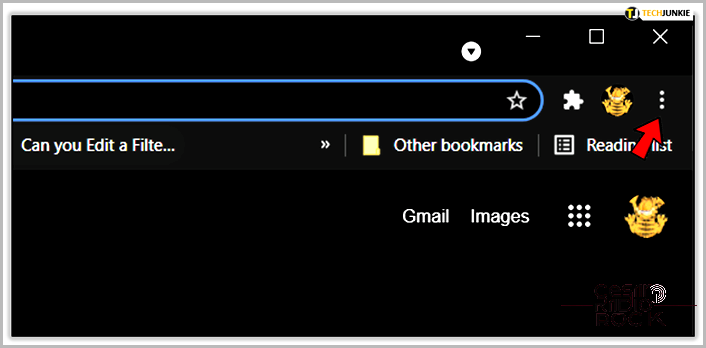
To use bookmarks in Chrome, you need to enable this feature. Open Chrome and click on the Menu (those three dots in the top right corner of the window). Scroll down and look for Bookmarks. When you hover over it, a new list will appear. Click on Show Bookmarks Bar.
Our Recommendation
Private: Top Four Google Chrome Extensions to Download & Save YouTube Videos
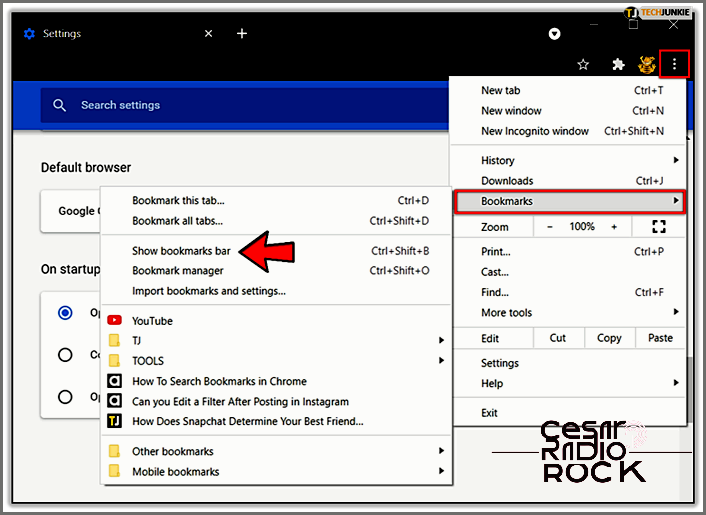
If you want to bookmark a page in Chrome, there’s a quicker way to do it using your keyboard. Just press Ctrl+Shift+B, and your bookmarks will appear right below the search bar on top of the Chrome window.
Here’s How to Bookmark a Page in Chrome
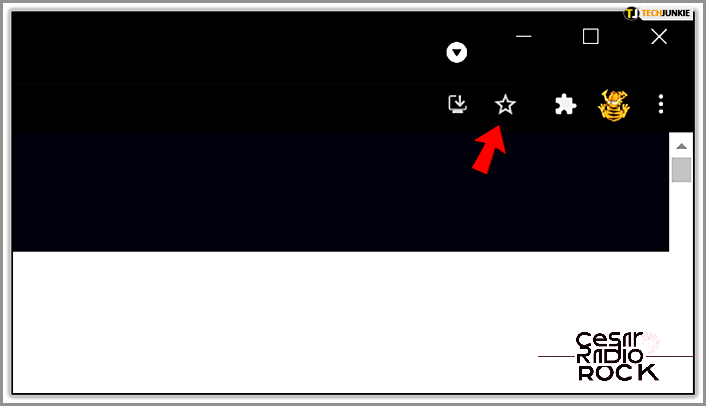
It’s really simple, I promise. Just click on the star icon at the right end of the search bar where the page’s URL is displayed. When you do that, a new window will pop up, giving you the option to rename the bookmark or simply save it. Just click on “Done” when you’re all set. Oh, and you can also organize your bookmarks into folders, but we’ll talk about that later.
The Top Cameras for YouTube
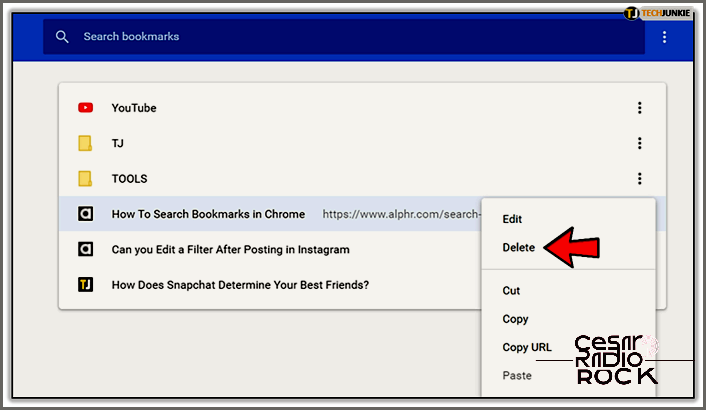
If you don’t want a page to show up in your bookmarks anymore, you can effortlessly remove it from the list.
To get started, open Chrome and locate the Menu. Look for Bookmarks in the menu and click on it. Once a new list pops up, find the page you want to remove and right-click on it. Then, simply click on Delete.
How to Bring in Bookmarks from Other Browsers
If you had another browser before switching to Chrome, you might be missing your old bookmarks. Chrome usually finds them during installation, but not always.
But don’t worry! You don’t have to start from scratch. You can simply import them. And Chrome has just the right tool for that.
- Click on the Menu icon in your Chrome window.
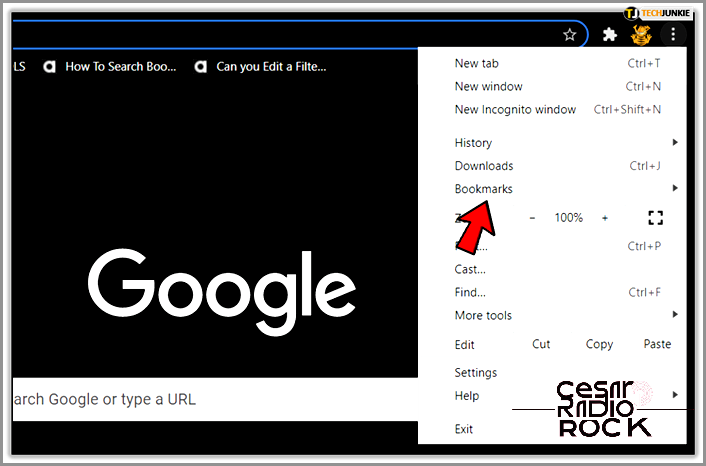
- Look for Bookmarks and hover over it.
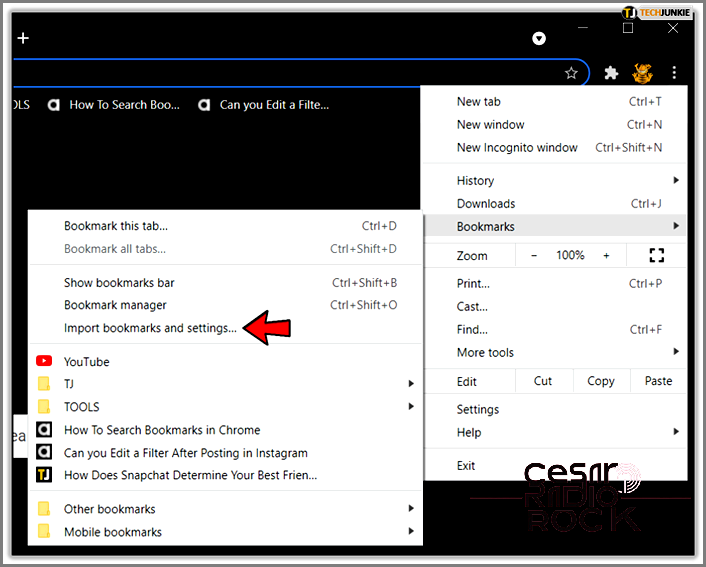
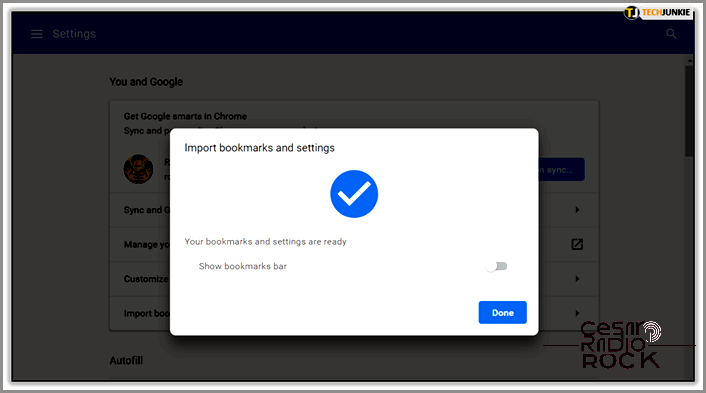
- When the new list opens, find Import bookmarks and settings and click on it.
- Select where you want to import the bookmarks from and click Import.
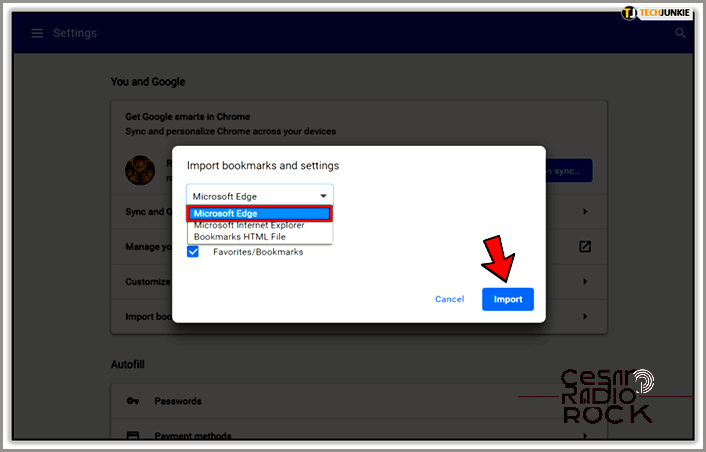
- Chrome will save the imported bookmarks either in a folder on the Bookmarks Bar or in Other Bookmarks.
How to Safeguard Your Bookmarks
If you want to make sure you never lose your bookmarks and can import them anywhere, the best solution is to back them up. It’s a simple task that won’t take too long.
- Open Chrome and click on the Menu.
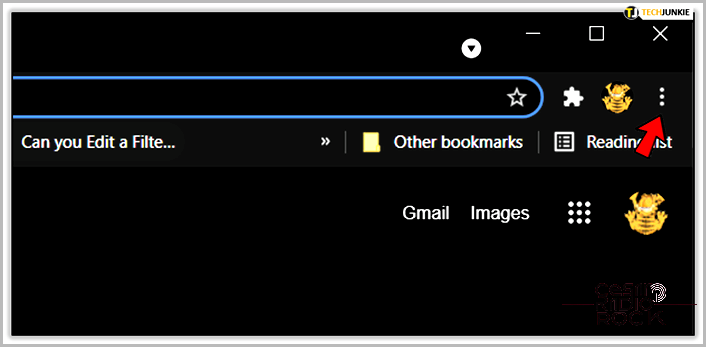
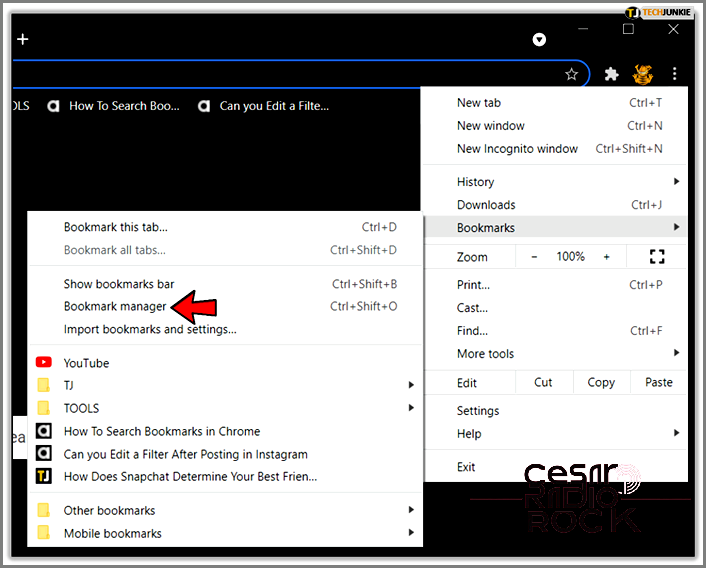
- Find Bookmarks and choose Bookmark Manager from the list that appears. You can also press Ctrl+Shift+O to open the Bookmark Manager.
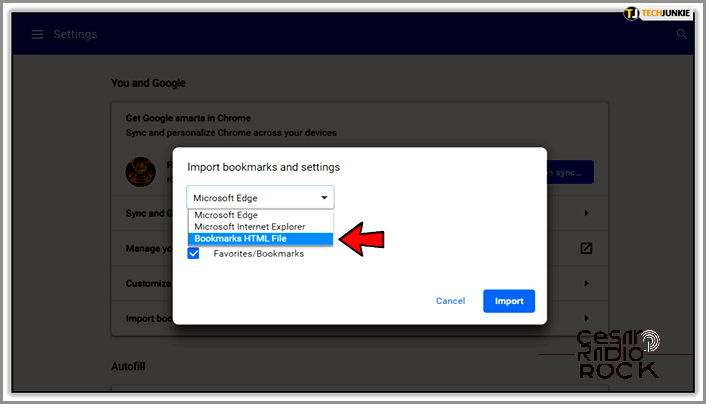
- In the pop-up window, select the Bookmarks HTML file option.
- Click on ‘Choose File’. A dialog box will open, allowing you to rename the file and choose where to save it.
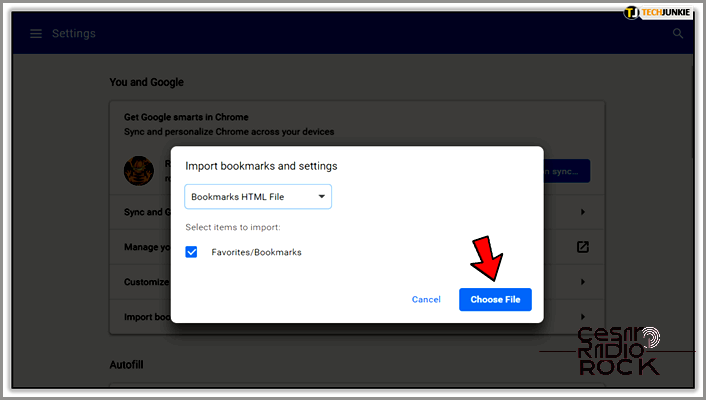
- You can easily access this file later through the Bookmark Manager.
How to Organize Your Bookmarks
Just like having a clean workspace helps you focus better, organizing your bookmarks in Chrome makes it easier to find things quickly.
Here are some tips on how to organize your bookmarks so you don’t waste time scrolling through a long list and never finding the page you need.
- Start with a big cleaning. You probably bookmarked pages you thought would be useful or that you planned to read later, but never did. If you don’t think you’ll have time to go through them anytime soon, just delete them. Having too many entries in your Bookmarks won’t do you any good.
- Create folders for different categories. Here are some ideas: Read Later, Study Material, Useful Tools, Recipes, Must-Watch Movies, etc. Keeping your bookmarks in separate folders will make it easier to find what you’re looking for.
If you’re not sure how to create a folder, follow these steps:
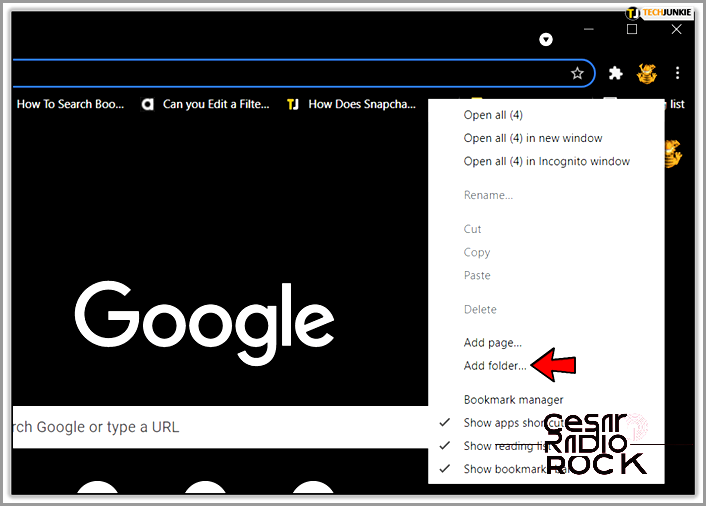
So here’s what you do: put your cursor on the Bookmarks Bar, somewhere in the middle of your web pages. Then, give it a right-click. A little menu will pop up, and from there, click on Add folder.
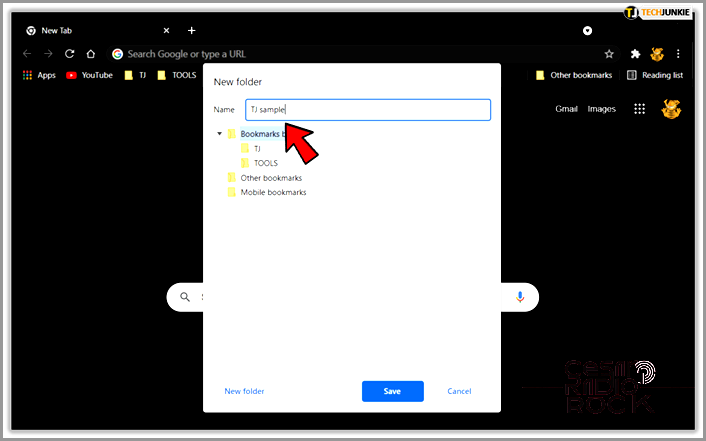
First things first – let’s give this folder a name! Think of something that captures the essence of what you’ll be storing inside. And don’t forget to choose a place where you want to keep it safe.
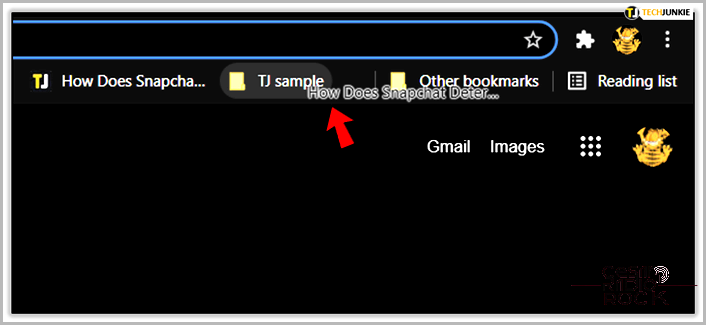
Hey there! Let me show you some handy tips to make managing your bookmarks a breeze.
- First things first, let’s talk about organizing your bookmarks. Simply drag and drop pages into your folder for easy access later on.
- Now, it’s time to declutter. If you’ve accidentally saved the same bookmark multiple times, don’t worry! There’s a nifty Chrome extension called Bookmarks Clean Up that can take care of it all. Plus, it can even tidy up your bookmark list by merging folders.
- Want to make your Bookmark Bar look sleek and streamlined? Consider renaming your bookmarks or leaving only icons for those pages that are easily recognizable. This way, you’ll have more room for other bookmarks on the bar.
See? With these simple steps, managing your bookmarks will be a piece of cake. Give them a try!
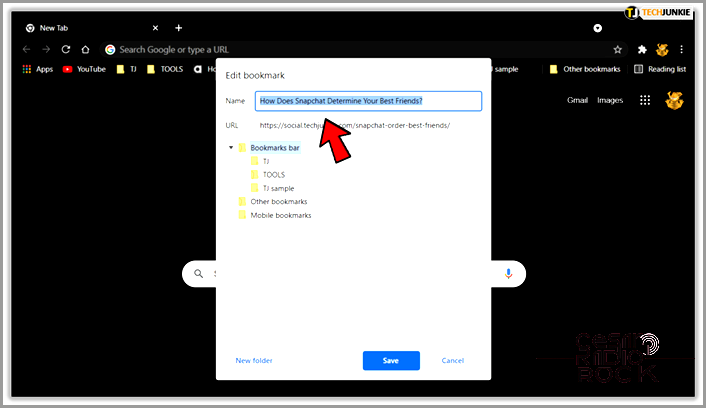
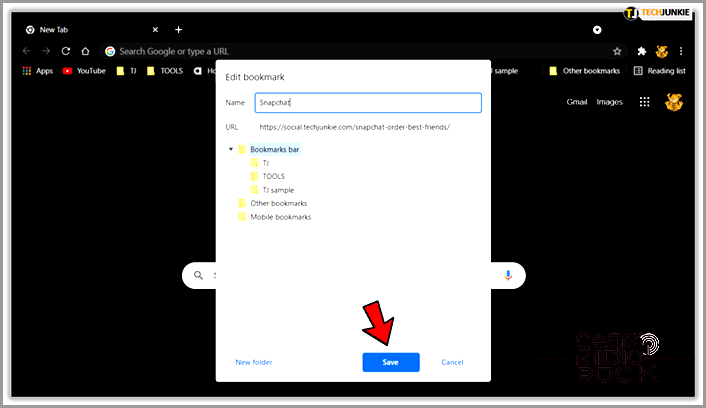
So, here’s how you can edit your bookmarks:
- First, right-click on the bookmarked page in the bar.
- Select ‘Edit’ from the options.
- You can now either change the name of the page or delete all the text.
- Once you’re done, simply click on ‘Save’.
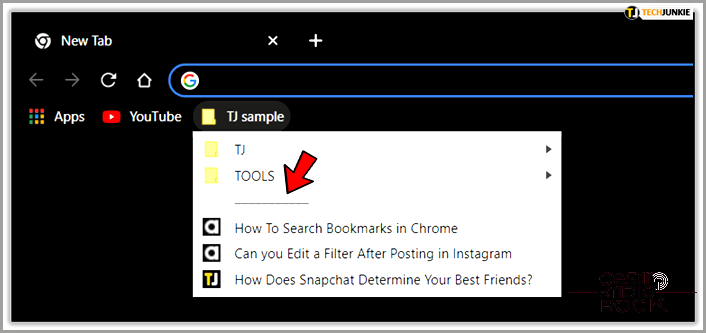
To make it even easier to find your pages, you can create separate sections in your bookmarks. Just group related folders together in the same section. There are websites that offer vertical or horizontal dividers for this purpose – they’re really easy to use and give a great effect.
Does this mean the internet is like a huge book?
It may sound like a small thing, but cleaning up and organizing your bookmarks can really improve your Chrome experience. Especially if you use the Bookmark Manager regularly and appreciate having things in order – just like you would on your desk or in your virtual office.
How about you? Do you keep your bookmarks organized? Let us know in the comments!
