Editing the Hosts File on Mac OS X
Hey there! Today, I want to show you how to edit the hosts file on your Mac. Now, you might be wondering, what is this hosts file and why should I care? Well, let me tell you.
The hosts file is a small, but powerful, text file that resides on your computer. It acts like a map, connecting domain names (like google.com) to their corresponding IP addresses. This means that when you type a website address into your browser, your computer first checks the hosts file to see if it already knows the IP address for that domain. If it does, it uses that information to connect to the website directly, without having to ask a DNS server.
So why would you want to edit the hosts file? There are a few reasons. Maybe you want to block access to certain websites or control how your computer connects to a specific server. Or perhaps you’re a web developer and need to test a website before it goes live. By editing the hosts file, you can redirect a domain name to a different IP address, allowing you to preview the website on your own machine.
Now, let’s get down to business. Here’s how you can edit the hosts file on your Mac:
1. Open a Terminal window. Don’t worry if you’ve never used Terminal before – it’s not as scary as it sounds. Just search for “Terminal” in Spotlight (the magnifying glass in the upper-right corner of your screen) and click on the Terminal app.
2. In the Terminal window, type in the following command and press Enter:
sudo nano /etc/hosts
You’ll be asked to enter your password – go ahead and do so. Don’t worry if you don’t see any characters as you type – that’s just a security measure.
3. Now, you’ll see the hosts file open in a text editor called nano. This is where the magic happens. You’ll notice that the file is divided into two sections: a list of IP addresses and their corresponding domain names, and some comments (lines that start with a # symbol) providing explanations and examples.
4. To add a new entry to the hosts file, simply move your cursor to an empty line below the last entry and type in the IP address, followed by a space, and then the domain name. For example:
127.0.0.1 mywebsite.com
This line would redirect mywebsite.com to your own computer (127.0.0.1 is the IP address for localhost).
5. Once you’ve made your changes, press Ctrl + X to exit nano. You’ll be asked if you want to save your changes – type “Y” and press Enter.
And that’s it! You’ve successfully edited the hosts file on your Mac. Now, when you type in the domain name you added, your computer will use the IP address you specified.
Just keep in mind that the hosts file can be a powerful tool, but it should be used with caution. Making incorrect edits or removing essential entries can cause connectivity issues, so be sure to double-check your changes.
I hope this guide has been helpful for you. If you have any questions or need further assistance, feel free to reach out. Happy editing!

Hey there! So, let’s talk about the Mac hosts file. It’s a pretty important text document on Mac OS X that lets us map hostnames to specific IP addresses. Now, I know we have DNS servers for this stuff, but sometimes we want to take matters into our own hands, you know? That’s where the hosts file comes in handy.
When we edit the hosts file on Mac, we can manually direct a website address to a specific IP address. Pretty cool, right? We can even use it to block access to a site by pointing it to an unused or internal IP address. So, if you want to learn how to edit the Mac hosts file on OS X, I got your back.
Edit Mac Hosts File with Text Edit
Now, there are a couple of different ways we can edit the hosts file in Mac OS X. One way is to use something called TextEdit as our trusty Mac hosts file editor. Since the hosts file is a simple text document, TextEdit works just fine for this job. But here’s a little tip: TextEdit can’t open the hosts file directly. So, what we need to do is copy the file to a safe spot, like our Desktop, make our edits there, and then bring it over to TextEdit.
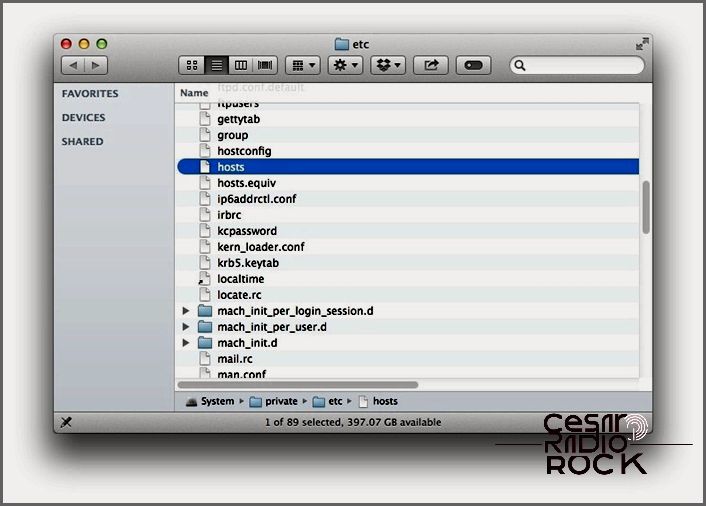
Alright, let’s find that hosts file together. Open up Finder, and in the menu bar at the top, click on Go and then select Go to Folder. A little box will pop up, and in there, type in the following location:
/private/etc/hosts

When you click on it, a brand new Finder window will magically appear, showing you the marvelous hosts file that resides within your trusty Mac. It’s like opening a secret door to a hidden treasure! But wait, there’s more! Not only can you gaze in awe upon the file, but you can also take hold of it and drag it out of the Finder window with your mighty cursor. Then, with a flourish of computer magic, you can drop it onto your desktop, creating a portal to a world of limitless editing possibilities. It’s as if you’ve set the file free, allowing you to customize it to your heart’s content. Now, let the editing adventure begin!

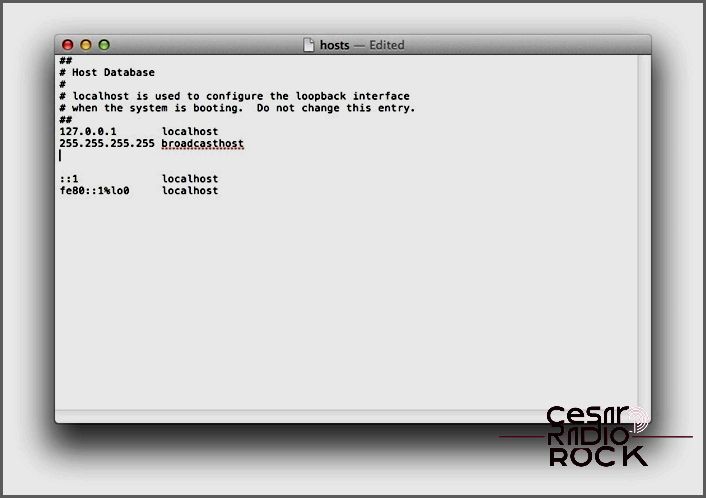
If you want to open the Mac hosts file default, all you have to do is double-click and it will show the contents of the file in TextEdit. The hosts file is usually pretty basic, with just a few lines of descriptive text that are “commented out” with the pound or number sign (#). It also includes IP values for localhost and broadcasthost. To make changes to the file, you just need to add your own lines after broadcasthost.

If you’re using a Mac, one way to block access to specific websites is by editing the hosts file. This file allows you to assign an IP address to a hostname, effectively blocking access to that site. In our case, we want to block YouTube, so we’ll map www.youtube.com to 0.0.0.0, which is an invalid IP address, resulting in an error. This means that anyone using the Mac won’t be able to load the YouTube page in their web browser.
Another method is to use the IP address of a valid site instead of 0.0.0.0. To find a website’s IP address, you can use the “ping” command in Terminal. Simply open Terminal and type “ping www.website.com”, replacing “www.website.com” with the website you want to block.
Once you’ve made the necessary changes to the hosts file, save it in its current location on the Desktop. Then, drag and drop the file back to its original location at /private/etc. If the Finder window is closed, you can use the “Finder > Go > Go to Folder” command to reopen it.
When you drop the hosts file back to its original location, OS X will ask you what to do about the existing unmodified hosts file. Choose “Replace” and enter your administrative user password to confirm the transfer.
Now you can open a web browser to test the changes. If the desired changes haven’t taken effect, you may need to clear the DNS cache. For OS X Lion and OS X Mountain Lion, you can open Terminal and use the command “sudo killall -HUP mDNSResponder” (don’t forget to enter your admin password). For OS X Mavericks, use the command “dscacheutil -flushcache; sudo killall -HUP mDNSResponder” instead.
