Creating a Watermark on Pixlr: A Step-by-Step Guide
I’m going to show you how you can add a watermark to your images using Pixlr, a user-friendly online photo editing tool. Adding a watermark can protect your valuable content and help you establish your brand. Let’s get started!
First, open Pixlr in your web browser. If you don’t have an account, don’t worry, you can use it for free without any sign-up hassle. Once Pixlr loads, choose the “Open Image” option and select the image you want to add a watermark to.
Next, you’ll want to create your watermark. A watermark is usually a logo or a text that identifies your work. To make it stand out, choose a bold and unique font. Pixlr offers various font options to choose from. Write your desired watermark text and adjust its size, position, and opacity to your preference.
Once you’re satisfied with your watermark, you’ll want to position it on your image. To do this, use Pixlr’s transform tool that allows you to move, rotate, and resize your watermark. Adjust it according to your taste and make sure it doesn’t obstruct the view of your image.
Now, let’s make sure your watermark is visible, yet doesn’t interfere with the aesthetics of your image. Pixlr offers blending modes that enable you to merge your watermark with your image seamlessly. Experiment with different blending modes until you find the perfect one that fits your image’s look and feel.
To preserve your image’s quality and resolution, it’s essential to save it in the right format. Pixlr allows you to save your image as a high-quality JPEG, PNG, or even a layered PXD file that you can further edit later. Choose the format that suits your needs best and save your image to your device.
Voila! You’ve successfully created a watermark on Pixlr. Your image now carries your personal touch and protection. Feel free to use this technique to add watermarks to all your images, keeping your work safe and promoting your brand without any hassle.
Remember, practice makes perfect, so don’t be afraid to experiment and customize your watermark to reflect your unique style. With Pixlr, the possibilities are endless!

Why do I, and many others, choose to create a free watermark using Pixlr? Well, the answer is simple: other popular programs like Adobe Photoshop require a subscription fee to access their tools for watermark creation. And while there are free options like GIMP available, they can be a bit too complex for some users. On the other hand, Pixlr offers a user-friendly interface and powerful design tools, making it the ideal choice.
Step-by-Step Guide: Creating Your Own Watermark with Pixlr
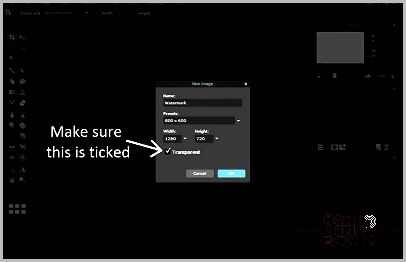
First things first, let’s get started! Log into your Pixlr account, and navigate to the “Pixlr Editor” section. Once there, click on the “Create New Image” option. A window will prompt you to enter a name for your new image – let’s go with “Watermark” for now. Now, it’s time to set the width and height of your image. For the purpose of creating a watermark for a 720p video, the dimensions should be 1280W X 720H.

When you do this, a document will appear with the transparency setting activated. This means that whatever you put in this space can be made less opaque and more see-through.
Create Your Watermark
You probably have your own watermark that you want to insert into the document. When you do this, try using different file formats because some may cause a few problems.
However, if you want to design and make your own watermark on Pixlr, you can do it on this page.
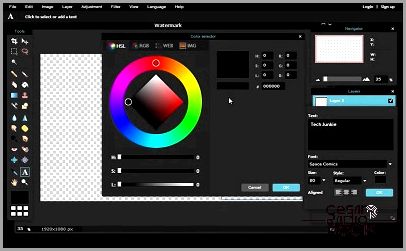
On the left of the GUI, there’s a text tool. You can use this tool to write out your watermark. You might want to use a logo or something like “Test Version” or “Editor’s Copy.”

When you use Pixlr, you have the power to choose everything about your text. You can pick the font, style, size, color, and alignment with the text tool. Once you’ve made your choices, you can enter the watermark onto your document and make any changes you want. You even have the option to add layers and additional effects like a drop shadow, inner shadow, or bevel.
The tools in Pixlr may not be as powerful as the ones you find in Photoshop software, but they are still better than what you get with Paint 3D, Gimp, and most other online tools. The only tricky part is figuring out how to use them effectively to get the best results. The good news is that there’s no fee for experimenting, so you can try different settings as much as you want until you find the ones that work for you and your brand.
How to Save Your Watermark
It’s important to save your watermark as a PNG file. Simply go to “File” and then “Save As.” The Pixlr program will actually let you know that your image’s transparency will be saved. In the format selector, you’ll see “PNG (Transparent, full quality),” which is exactly what you need.
If you decide to open your watermark with another tool, be careful when saving it. Even if you save it as a PNG, you might lose the transparency. The watermark you create with Pixlr should be your final version. If you want to add more to it, then you need to use a tool with the proper transparency functions like Pixlr or GIMP.
Creating a More Transparent Watermark
So far, we’ve shown you how to add a watermark or logo over your video. But what if you want to add an almost transparent watermark? In that case, you can adjust the layer settings of your watermark to make it less opaque.

Hey there! On the right side, you’ll find an opacity slider. Give it a try to adjust how transparent your watermark is. Moving it to lower percentages will allow more of the images behind the watermark to show. It’s not ideal for the viewing experience, but it gives a better idea of what’s going on without completely blocking the visual elements.
Using Your Watermark
Basically, you just need to drag your new watermark image into your video editor and place it on top of your video. Since it’s transparent, only the watermark will show, and nothing else.
Make sure you place the watermark as the top layer in your video editor. Otherwise, other elements may appear above the watermark, and you probably want it to be visible at all times when your video is playing.
Is Your New Watermark Copyrighted?
Now, let’s talk about creating a brand-new watermark or logo using the Pixlr tools. Do you need to give credit to Pixlr or worry about copyright? In almost every case, you can freely use your watermark without any issues for Pixlr. The only unlikely problem would be if you use a font that is restricted by rights, which is highly unlikely unless you intentionally downloaded and installed such fonts.
Have you created your own watermark? Was it easier than using GIMP? Do you miss having more design tools like Photoshop? Share your thoughts with us in the comments section below!
