Adding Detailed Metadata to Ripped Movies in iTunes: A Simple Guide
Hey there! Today, I want to show you how to take your movie collection to the next level by adding detailed metadata to your ripped movies in iTunes. This may sound fancy, but trust me, it’s easier than it sounds. So, let’s dive in!
First things first, what exactly is metadata? Well, think of it as information about your movies that goes beyond just the title and basic details. It can include things like the director, actors, release year, genre, and even a brief synopsis. Having this extra information not only makes organizing your collection easier, but it also enhances your overall movie-watching experience. You’ll feel like a true cinema connoisseur!
Now, let’s get into the nitty-gritty. To add metadata to your ripped movies, follow these simple steps:
Step 1: Open iTunes and click on the “Movies” tab. This will take you to your movie library.
Step 2: Locate the movie you want to add metadata to and right-click on it. A menu will pop up.
Step 3: In the menu, click on “Get Info.” This will open a new window with various tabs.
Step 4: Go to the “Info” tab. Here, you’ll find fields where you can enter all the juicy metadata for your movie.
Step 5: Start with the basics, like the title, director, and year. Simply type in the information in the respective fields.
Step 6: If you want to take it up a notch, you can add the actors, genre, and even a poster image to make your movie stand out.
Step 7: Don’t forget to write a short synopsis in the “Description” field. This will give you a quick overview of the movie whenever you need it.
Step 8: Once you’ve filled in all the desired fields, click on “OK” to save your changes.
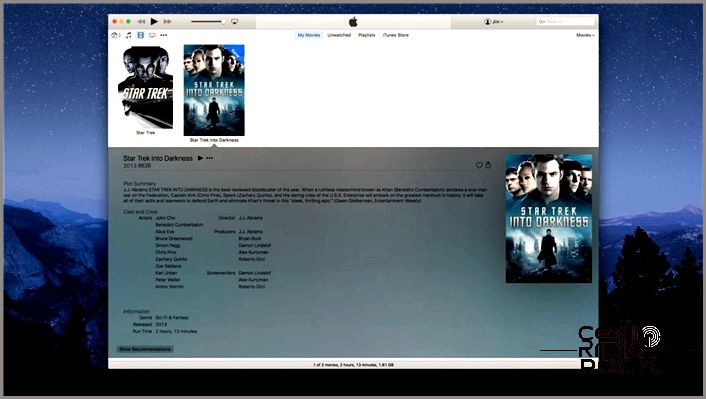
Voila! You’ve just added detailed metadata to your ripped movie in iTunes. Now, when you scroll through your movie collection, you’ll see all the extra information displayed beautifully alongside the movie’s poster. Isn’t it amazing how these little details can make such a big difference?
Remember, adding metadata is not only practical but also fun. It allows you to explore your movies in a whole new light and share your collection with others. Plus, it’s a great way to impress your friends with your movie knowledge!
So, don’t hesitate to dive in and have fun adding detailed metadata to your ripped movies in iTunes. Happy organizing and happy watching!

When you buy a movie from the iTunes Store, it appears in your iTunes library with all the important details like the cover art, summary, cast and crew information, and other metadata. But, when you import ripped DVDs or Blu-rays into iTunes, it’s a different story. By default, these imported movies are categorized as “Home Movies” and lack all the metadata and artwork. You can manually edit certain metadata like the title, year, and artwork, but you can’t change things like the plot summary, cast and crew, and MPAA rating using the default iTunes interface.
Luckily, if you’re using a Mac, you can add complete metadata to your ripped movies with the help of a third-party utility called Subler. Here’s how it works:
1. Download Subler from the project’s website and unzip the file to reveal the app. Double-click to launch it. Unlike most apps, Subler won’t display any windows or interface until you give it a file to process.
2. Find the movie file you want to add metadata to. It should be a file that’s compatible with iTunes, like a movie ripped with one of the presets in Handbrake, and it must not have DRM protection. Subler can only be used with files you encoded yourself or obtained from DRM-free sources. If the movie is already in your iTunes library, delete it but make sure to keep the original file.
3. With your ripped movie file in Finder, click, drag, and drop it onto the Subler icon in your Dock. A new window will appear showing basic video and audio properties of the file.
4. If you want, you can manually add any category of metadata by clicking the plus icon in the lower-left corner of the window. But, Subler also has a search feature that instantly pulls relevant information and artwork for the file by searching its name.
5. To match your ripped movie to an existing entry in the iTunes database, click the magnifying glass icon at the top-right of the Subler window. Subler will perform a search based on the file’s name, but you can manually search for any movie title. Select the correct entry from the list and click “Add.”
6. You’ll be taken back to the main Subler window, where you’ll see all the relevant metadata displayed for your file. You can leave the data as it is or edit and tweak it to your preferences. You can also customize the artwork and other settings if you want.
7. After making all your edits, use the keyboard shortcut Command-S to save the metadata to the original file itself. You can also use the “Save As” function to create a new copy with your added metadata while preserving the original file.
8. Once your movie file is saved, drag it to iTunes to add it to your library. The file will now be displayed in the “My Movies” section with artwork and all the same metadata as an official iTunes purchase. These changes will also carry over to your iDevices and Apple TV when you sync your library or use Home Sharing.
Using Subler can give your personal movie collection a makeover and make browsing your iTunes library more enjoyable. It’s worth noting that you can also use Subler to add detailed metadata to your personally ripped TV shows by selecting the “TV Episode” tab and entering the show’s name, season, and episode numbers. Subler will take care of the rest!
