Easy Steps to Joining a Server on TeamSpeak
Hey there! I’m here to guide you through the simple process of joining a server on TeamSpeak. Whether you’re a seasoned user or new to this platform, I’ve got you covered. Let’s dive in and get started!
First things first, make sure you have TeamSpeak installed on your device. If you don’t have it yet, don’t fret! It’s easy to download and install from their official website.
Once you have TeamSpeak up and running, launch the application. You’ll notice a window opening up, and that’s where the magic happens. Get ready!
At the top of the application window, you’ll find a menu bar. Look for the “Connections” option and click on it. Now, a drop-down menu will appear, revealing several choices. What you want to do is select “Connect” from this list.
As soon as you click on “Connect,” another window will pop up. This window is where the real action begins! Fill in the required information to connect to a server.
The first field you’ll see is “Server Nickname.” Here, you can name the server you’re trying to join. Give it a name that makes sense to you, so you can easily identify it in the future. It could be something like “My Favorite Gaming Server.”
Now, let’s move on to the second field, which is “Server Address.” This is where you need to input the specific address or domain of the server you want to join. Double-check the information to make sure you’ve entered it correctly. An example of a server address could be “ts.mygamingserver.com.”
Almost there! The last piece of information you’ll need is the “Nickname” field. This is your chance to choose the name you want to be known by on the server. You can get creative and pick a cool nickname that reflects your personality. Feel free to have some fun with it!
Once you’ve filled in all the fields, take a deep breath and click on the “Connect” button. Sit back and relax for a moment as TeamSpeak does its magic. It will establish a connection to the server and, before you know it, you’ll be part of a vibrant community!
Congratulations, my friend! You have successfully joined a server on TeamSpeak. Now you can interact with others, join group chats, and enjoy all the features this amazing platform has to offer.
Remember, you can always disconnect and connect to new servers whenever you want. TeamSpeak allows you to explore various communities and find the ones that suit your interests.
That’s a wrap! I hope this guide has been helpful and that you’re excited to start your TeamSpeak adventure. So go ahead, join that server, and have a blast connecting with people from around the world. Happy chatting!

Joining a server on TeamSpeak is like hopping onto a conference call. It’s a basic action, but TeamSpeak might seem complex if you’re new to it.
If you’re used to messaging tools, you might need a guide to navigate TeamSpeak. Here’s how you can join a server on this popular app.
Connecting to a Server
Let me show you how to connect to a specific server, whether it’s public or private. First, go to the top-right corner of your TeamSpeak client window and click on Connections. In the menu that appears, click on Connect. Alternatively, you can simply use the Ctrl+S command to go straight to the Connect menu.
The Connect menu will ask you to enter the server address and password (if needed) and choose your Nickname. After that, click on Connect, and you should gain access to that particular server. Use this method when you know which server you want to join.
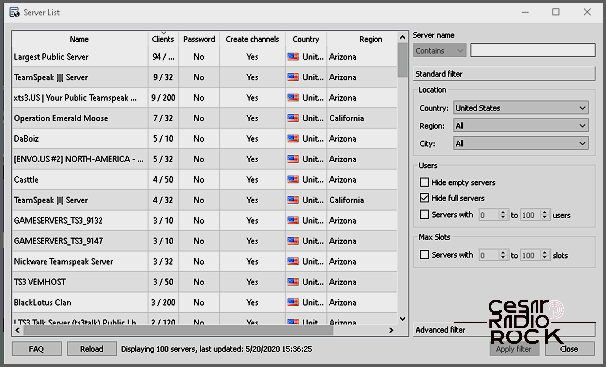
Alternatively, you can explore all the available servers. To do this, go to the Connections menu and select Server List. If you’re in a rush, you can also press Ctrl+Shift+S to get there quicker.

In the Server List window, you’ll find a list of servers in your country. You can filter the results by country or select “All” countries worldwide. You can also choose the specific region and city you’re interested in. In the main box of the Server List screen, you’ll see the filtered servers. Just click “Apply filter” to see the results.
If you’re looking for a particular server, you can search for it by name. To connect to a server, simply double-click on its entry in the list. That will immediately connect you to it, unless it’s password-protected.
You’ll be able to see which servers require a password in the Server List. When you connect to a server, TeamSpeak will use your default nickname. But don’t worry, you can always change your nickname by clicking on the “Self” tab in the upper screen menu and selecting “Change Nickname.”
Now that you’ve joined your desired server, let me give you some tips on how to interact with other users. Each server may have its own rules, but here are some general guidelines that apply to most servers.
When using TeamSpeak, it’s common for people to communicate through voice rather than text. So it’s important to know how to use your microphone properly. First, make sure your mic is close to your computer so others can hear you clearly. And check with others if they can indeed hear you well.
However, you shouldn’t keep the mic too close to your mouth either. If it’s too close, it will pick up the sounds of your breathing, which can be distracting for others. Keep the mic at a distance from your mouth to avoid this issue.
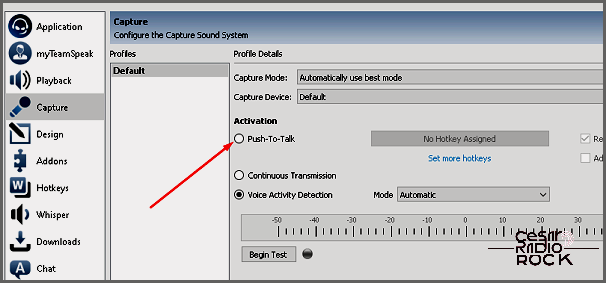
To avoid cluttering the voice channels, TeamSpeak has a push-to-talk option. By default, it’s turned off, so you can speak freely once you join a voice channel. However, it’s considerate to use the push-to-talk option to only transmit relevant information. This helps keep the channels organized and prevents unnecessary noise.
Remember, proper etiquette goes a long way in creating a positive experience for yourself and others on TeamSpeak. Enjoy your time on the server!

To enable the push-to-talk feature, head over to the “Tools” section and then select “Options”. From there, go to “Capture” and choose the button next to the “Push-To-Talk” setting. This will prompt you to assign a hotkey for the feature.
Now, let’s talk about using Whisper. Sometimes, you may want to have private conversations with specific users, channels, or groups without everyone else on the channel overhearing. That’s where Whisper comes in handy. To set it up, follow the same steps as before, but this time choose “Whisper” from the Options menu. Then, select “Whisper Lists” and create a list of people you want to Whisper to. You can even choose a hotkey to start a private chat with them.
Whisper is a great feature that helps maintain organization and reduce clutter on the server.
Now, let’s discuss how to join a TeamSpeak server. It’s pretty straightforward. However, it’s important to know and follow some basic rules and etiquette that most TeamSpeak servers have in common. Remember to use your microphone correctly, use push-to-talk, and utilize Whisper when appropriate.
I’d love to hear about your experience setting up TeamSpeak. How many servers did you join? Are you making use of the push-to-talk and Whisper options? Join the discussion in the comments below and let us know how this article has helped you join a TeamSpeak server.
