Creating a Photo Collage with Music for Facebook
Hey there! Today, I’m going to show you how to make a cool photo collage with music for all your friends to see on Facebook. It’s a simple process that will add some flair to your social media game. So, let’s get started!
First things first, gather all the photos you want to include in your collage. Pick the ones that bring back great memories or tell a story. Remember, your collage should be a visual representation of the moments you love.
Next, open up your favorite photo editing software. You can find plenty of free options online if you don’t have one already. Once you’re in the software, create a new project and set the dimensions for your collage. Keep in mind that Facebook has specific guidelines for photo dimensions, so make sure your collage fits within those parameters.
Now that you have your blank canvas, it’s time to unleash your creativity. Arrange your photos in a way that speaks to you. You can play around with different layouts, sizes, and rotations. Don’t be afraid to experiment!
Once you’re satisfied with the arrangement, it’s time to add some music to your collage. Find a song that represents the mood or theme of your photos. It could be a catchy tune, a soothing melody, or anything that resonates with you. Just make sure you have the rights to use the music, as copyright infringement is a big no-no.
Now, import your chosen song into the software. You can usually do this by clicking on the “Add Audio” or “Import Media” button. Once it’s added, you can trim the song to fit the length of your collage. You don’t want the music to drag on for too long or end too soon, so find a sweet spot that matches the visual story you’re trying to tell.
With your photos and music in place, it’s time to add some effects. Get creative with filters, overlays, and text. You can enhance the colors, add a vintage look, or even include captions to give your collage extra personality. Just remember to keep it balanced and not overdo it.
When you’re satisfied with the final result, export your collage. Save it on your computer or device with a recognizable name so you can easily find it later. Now you’re ready to share your creation with the world!
Log in to your Facebook account and go to your profile. Look for the “Create Post” box and click on the “Photo/Video” option. Choose the collage you just made from your saved files and wait for it to upload. Once it’s done, add a catchy caption, tag your friends if you want, and hit the “Post” button.
Congratulations, you’ve just shared a fantastic photo collage with music on Facebook! Your friends will be amazed by your creative skills and the beautiful moments you’ve captured. So go ahead and embrace your inner artist. It’s time to add some rhythm and excitement to your social media feed!

To stay ahead in the digital marketing world, Facebook has some clever tricks that help both individuals and businesses showcase and sell their offerings. One such trick is creating a slideshow to promote your page.
Now, these slideshows are not just for advertising purposes and can only be used within a Facebook page. But the cool thing is, you have the freedom to upload your own music and select the pictures you want to include.
Now, let me show you how to create these awesome slideshows.
Creating a Slideshow from your Facebook Page
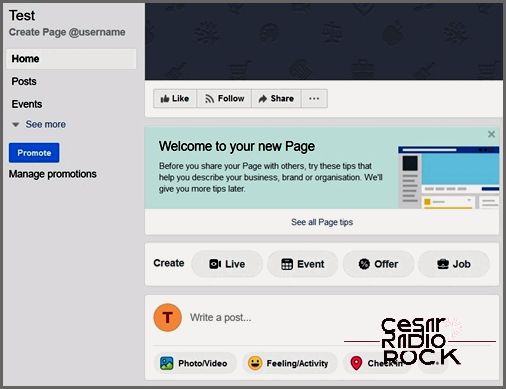
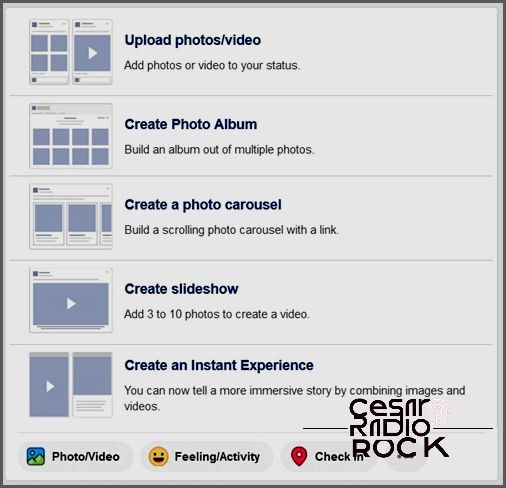
To create a slideshow on Facebook, you’ll need to have your own page. Slideshows are free to make and are designed to enhance the visibility of your page. Once you’re on your computer and logged into your page, look for the Photo/Video button below the status update text box.
That’s the button you want to click. It will open a smaller menu with different options. Choose “Create slideshow.”
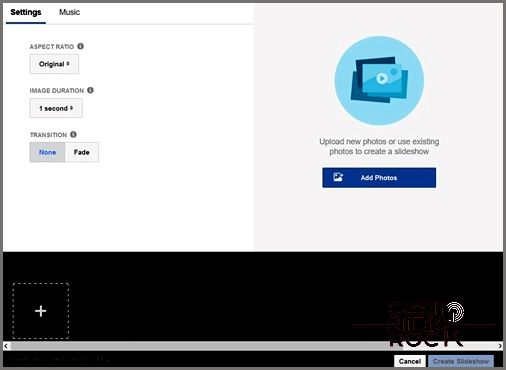
When you’re ready to create your slideshow, a new window will appear to guide you through the process. All you need is a minimum of three and a maximum of ten images. The rest is fairly straightforward. You can easily toggle between different transition effects, choose the aspect ratio, and determine how long each image will be displayed on the screen.
And that’s not all – you also have the option to add music. You can either select from Facebook’s collection of royalty-free tracks or upload your own music. However, it’s essential to keep in mind that you should avoid using copyrighted music without permission. Make sure you have the legal rights to the track you want to use before uploading it. Take a moment to check if it’s okay to upload the specific music you have in mind.
When you begin putting in pictures, you’ll have the option to either upload a photo or take one. Make the choice to “Upload Photo.”
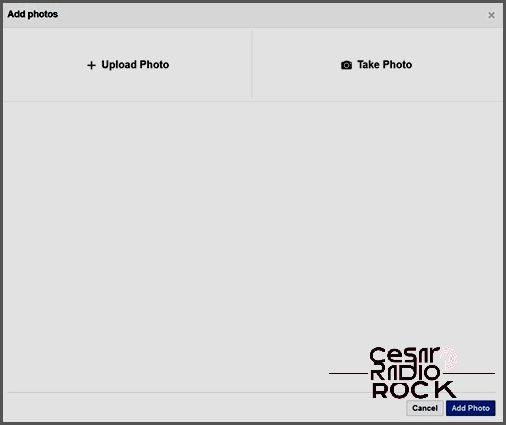
Luckily, you can add multiple photos all at once.
Once you’re finished, just click on “Create Slideshow.” Facebook is super quick at this, so it’ll take you right back to your page with the slideshow ready to be uploaded in just a few seconds. Before you upload it, you can preview the slideshow to make sure everything looks good. If something’s not quite right, there’s an “Edit” button inside the playback window that will take you back to where you were. If everything looks great, you can choose if you want to share it right away or schedule the upload for a specific time.
When you’re happy with the final result, click “Share Now.” Facebook will upload your slideshow in the background and let you know when it’s done through a notification.
Create a Slideshow from the Promote Menu
Facebook also gives you the option to make a slideshow to promote your business or Facebook page. This way, your slideshow can double as an advertisement.
To get started, just click on the “Promote” button below the page options. A Promote window will pop up. What you’re looking for is the “Promote Your Page” option, so go ahead and click on that.
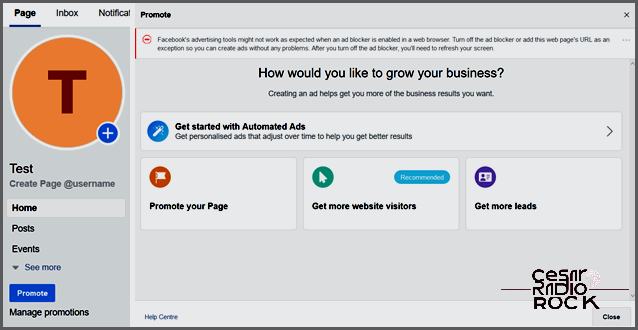
I find the ad creation options quite handy. They allow you to quickly determine the target audience, duration, budget, and payment currency for your ad. However, it’s important to note that you will incur costs when creating an ad.
Another convenient feature of creating ads this way is the ability to save a slideshow as a draft. Facebook will keep your unpublished ad for seven days. Additionally, if you hover over a picture in the slideshow creation window, you can edit the image by clicking on the small round pencil icon next to each thumbnail. This editing tool also lets you add a simple caption to each picture.
Some Helpful Tips
For optimal results, Facebook recommends that your pictures have a resolution of at least 1280×720 pixels. Another important consideration is consistency. All pictures should have a similar aspect ratio, as Facebook will lock the slideshow’s aspect ratio to 1:1 if there are discrepancies.
When it comes to video, Facebook suggests using MOV or MP4 file formats. For audio, they recommend WAV, MP3, M4A, FLAC, and OGG.
Logging Out
While Facebook’s slideshow creation option may not be the absolute best on the market, it is still a solid choice because it allows you to create multiple slideshows for free. One big advantage is how quick and easy it is to make a slideshow, even if you’re new to this feature.
Have you ever tried creating a slideshow for your Facebook page? Did you use it as an ad? Share your experiences with us in the comments below!
