A Guide to Creating Your Own Exclusive TeamSpeak Server
Hey there! Are you interested in setting up your very own private server on TeamSpeak? Well, you’ve come to the right place! In this guide, I’ll walk you through the steps to create a personal and exclusive server where you can chat and connect with your friends.
First things first, let’s get started. Here’s what you need to do:
Step 1: Downloading the TeamSpeak Server Software
To begin, you have to download the TeamSpeak server software. Don’t worry, it’s free! Just head over to the official TeamSpeak website and find the download page. Once you have the software, install it on your computer.
Step 2: Configuration
Now it’s time to configure your server. Upon launching the software for the first time, you’ll be prompted to set a username and password for the administrator account. Make sure to choose a strong password to keep your server secure.
Step 3: Port Forwarding
To allow others to connect to your server, you’ll need to set up port forwarding on your router. This process may vary depending on your router model, so I recommend checking the manufacturer’s instructions or doing a quick online search for guidance.
Step 4: Starting the Server
Once your server is configured and port forwarding is set up, you can finally start your TeamSpeak server! Simply launch the server software on your computer, and voila! You’re almost there.
Step 5: Connecting to Your Server
Now that your server is up and running, it’s time to connect to it. Open your TeamSpeak client application and enter the IP address of your server along with the port number. If all goes well, you should be connected to your private server!
Step 6: Customizing Your Server
The beauty of having your own server is the ability to customize it to your liking. You can create different channels, set permissions, and even upload your own server banner. Take some time to explore the server settings and make it truly yours.
Well done! You’ve successfully created your own private TeamSpeak server. Now you can invite your friends, have amazing conversations, and enjoy a secure and exclusive space for your online community. Happy chatting!

Creating your own private server may seem like a daunting task at first, especially when it comes to TeamSpeak 3 and its programming requirements. However, I assure you that if you follow this guide closely, you won’t encounter any major difficulties.
What’s great about this article is that it covers the method for the newest version of TeamSpeak, which is much easier compared to the previous one. So regardless of whether you’re using Windows or macOS, I’ll walk you through the steps for both operating systems.
Setting Up Your Private TeamSpeak Server
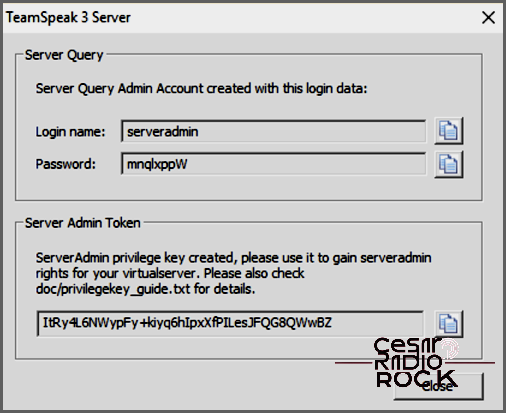
Before we begin, it’s important to note that these are general guidelines for creating a TeamSpeak server. You can adjust the server privacy settings and program access keys later on. However, one key that is generated during the setup process is the ServerAdmin privilege key, and that cannot be changed.
If you’re using macOS, you’ll need to use either CentOS 7 or Ubuntu. In this article, I’ll be using CentOS 7 because it requires fewer steps and yields the same results.
For Windows Users
Step 1: Download and Extract
First, you’ll need to download the TeamSpeak server software for Windows and extract it on your computer.
Once you have the TS3 files, run the ts3server.exe installer. You might encounter a few permission windows along the way, but simply allow the app to pass through the firewall and accept the terms of service.
Once that’s done, TeamSpeak 3 Server will provide you with the ServerAdmin privilege key.

Step 2
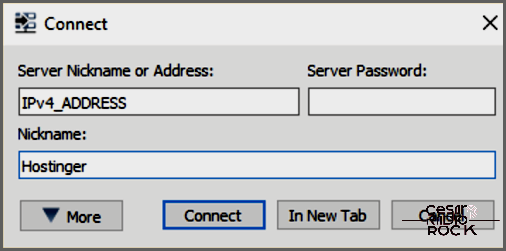
Let me do all the hard work for you – the installer, that is! All you need to do now is connect to the TS3 server. To do this, you need to know the correct IP address.
If you’re not completely sure about the address, no worries! Just open up Command Prompt and type in the ipconfig command. Once you see the results, keep an eye out for the IPv4 Address value – that’s what you’re looking for.

The final step is to enter the ServerAdmin privilege key, and ta-da! Your server is ready. Now you can adjust the server settings and set up a user password for private access.
Here’s how you do it on macOS:
To begin, make sure you have CentOS installed and running on your Mac. Start by updating your system using the “yum -y update” command. This will ensure you have the latest version.
Step 1: Generate a new system user for your TeamSpeak 3 server. Use the “adduser teamspeak” command to create the user. This command will also set the user’s home directory to “/home/teamspeak”. Use the “cd /home/teamspeak” command to access the directory.
Step 2: Get the TeamSpeak 3 server software for Linux. Make it quick by using the “wget” command and the provided link to download the software. Extract the downloaded file using the “tar xvf” command. The extracted files will be in the “teamspeak3-server_linux_amd64” folder.
Step 3: Now, let’s move all the files up one directory. Use the following commands: “cd teamspeak3-server_linux_amd64 && mv * /home/teamspeak && cd .. && rm -rf teamspeak3-server_linux_amd64-3.12.1.tar.bz2”. This command will also remove the setup file that you extracted. If you followed the instructions correctly, entering the “ls” command should show you the CHANGELOG and LICENSE files.
Step 4: Accept the license agreement by executing the command “touch /home/teamspeak/.ts3server_license_accepted”. This will create a “.ts3server_license_accepted” file as confirmation. Then enable the server and start the boot process. First, open the teamspeak.service file using “sudo nano /lib/systemd/system/teamspeak.service”. Inside this file, you’ll find a script that starts the server. Save everything, and enter the following two commands: “systemctl enable teamspeak.service” and “systemctl start teamspeak.service”.
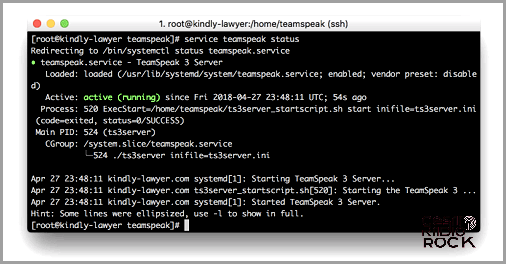
Expert Tip: If you want a detailed report about your server, use the “service teamspeak status” command. It will provide you with all the information you need.

Step 5
Now, you gotta grab a copy of the privileged key. Just use the cat /home/teamspeak/logs/ts3server_* command to locate the key.
Hey, congrats! You just set up your very own TeamSpeak server on Linux.
To start using it, you have to establish a new connection through the TeamSpeak client and enter the VPS IP address in the “Server Nickname or Address” bar.
The system will then ask you for the privileged key, and once you provide it, you’re good to go.
Setting Up a Server on New TeamSpeak
Let me show you how to create a free server on New TeamSpeak, but don’t worry, you can still make it private. The only limitation you’ll have is on the number of users and some other features, but it’s totally functional.
First, click on the Settings icon in the search bar at the top left corner of the TeamSpeak window. At the bottom of the right pane, you’ll see the “Create New Server” option. Click on it and choose whether you want to use TeamSpeak or be self-hosted.
Next, click the Get Started button, enter a name and password for your server, and hit Create. If you don’t set a password, your server will be public and the free slots might fill up quickly.
Once the server is generated, you’ll find it listed under “servers” in the options menu on the left. Just click on the corresponding icon to access all your servers.
Let the Fun Begin!
Creating a server may require a few steps, but it’s definitely something you can handle on your own.
So, have you ever tried creating a gamer-friendly server before? Was it more challenging than this? Share your experience with the rest of the TJ community in the comments section.
