Creating a Booklet in Word: A Step-by-Step Guide
Hey there! Today, I want to share with you a simple, yet effective method to create a booklet in Microsoft Word. So, let’s dive right in and get started!
First things first, open up Microsoft Word and click on the “File” tab in the top left corner of your screen. Now, select “New” to create a blank document.
Once you have your blank page ready, go ahead and click on the “Layout” tab. Under this tab, you’ll find various options for adjusting the layout of your document.
Now, here comes the fun part. Look for the “Orientation” option and select “Landscape” from the drop-down menu. This will change the page orientation from the default portrait mode to a landscape mode, which is perfect for creating a booklet.
Next, let’s adjust the margins. Go back to the “Layout” tab and click on “Margins”. Here, you can choose the margin size that suits your booklet. A smaller margin size will allow for more content per page, but keep in mind that it might make it a bit challenging to read when the booklet is printed.
Awesome! Now that we have our page set up, it’s time to think about the content. Remember, a booklet is typically smaller in size, so you’ll want to make sure your text isn’t too lengthy.
To make the text fit nicely in the booklet, we’ll have to adjust the font size and spacing. Click on the “Home” tab and look for the “Font” section. Here, you can choose a smaller font size and adjust the spacing if needed. Don’t worry, you can always preview how it will look before actually printing it out.
Once you’re happy with the appearance of your text, it’s time to organize the content in a booklet format. Depending on the length of your text, you might want to consider dividing it into sections or chapters. You can use headers or subheadings to indicate these breaks in your booklet.
When it comes to arranging the pages, Word has a nifty feature called “Book Fold”. To find it, go back to the “Layout” tab and click on “Page Setup”. In the drop-down menu, select “Book Fold”. This option will automatically rearrange your pages so that they can be printed and folded into a booklet.
Now, let’s review our work. Click on the “View” tab and select “Print Layout” to see how your booklet will look when printed. Take your time to go through each page and make sure everything is just the way you want it.
Finally, it’s time to print and share your masterpiece! You can do this by clicking on the “File” tab again, and then selecting “Print”. Make sure you have enough paper in your printer, and choose the appropriate settings for your booklet.
That’s it, my friend! You’ve successfully created a booklet in Word. Now you can enjoy the satisfaction of holding your own professionally-looking booklet in your hands. So go ahead, get creative, and put your ideas on paper!
Remember, practice makes perfect, so don’t hesitate to try different layouts and designs until you find the one that suits your needs. Happy booklet-making!

Hey there! Did you know that Word can do more than just basic documents? You can actually use it to create your own book or booklet! And the best part is, you don’t need to be a formatting expert to do it.
In this article, I’m going to show you a simple, step-by-step guide on how to create a booklet or book in Word. Even if you’re not familiar with the app, just follow my instructions closely and you’ll have no trouble making your very own booklet.
But that’s not all! I’ll also walk you through preparing your document for print and give you a quick overview on how to print on both sides, even if your printer doesn’t support the auto option.
Creating a Booklet in Word
Step 1
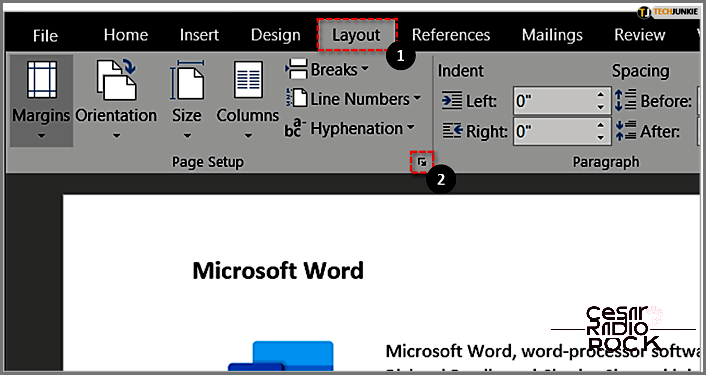
The first thing you need to do is open a Word document. Once you’ve done that, go ahead and select the Page Layout tab (or the Layout tab, depending on your version of Word). Look for a small icon on the bottom-left corner of the tab, and click on it to open the Page Setup window.
Step 2
Now we’re going to tweak a few settings in the Page Setup window. Start off by clicking on the Margins tab. Look for the dropdown menu next to “Multiple pages” and give it a click. From the options that pop up, choose “Book fold.”
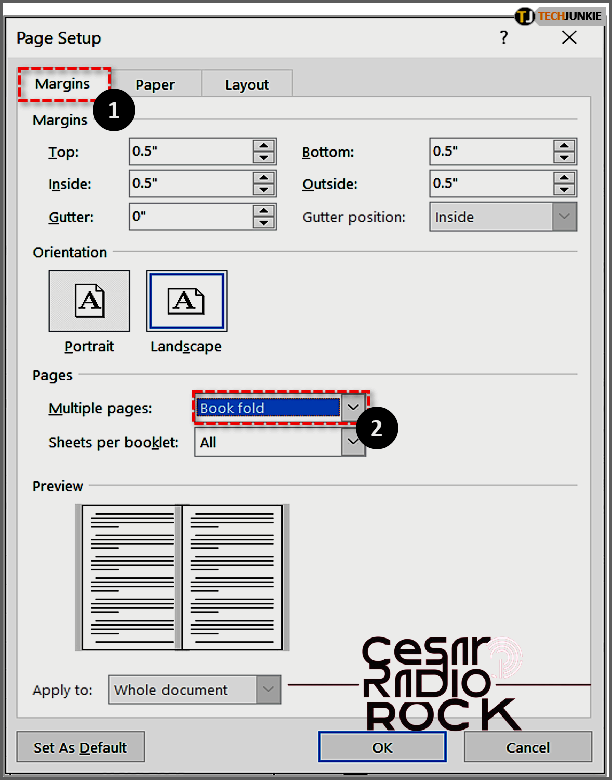
Once you choose “Book fold,” the page layout automatically switches to Landscape. When making a booklet, it’s important to keep it in Landscape mode.
Important Reminder
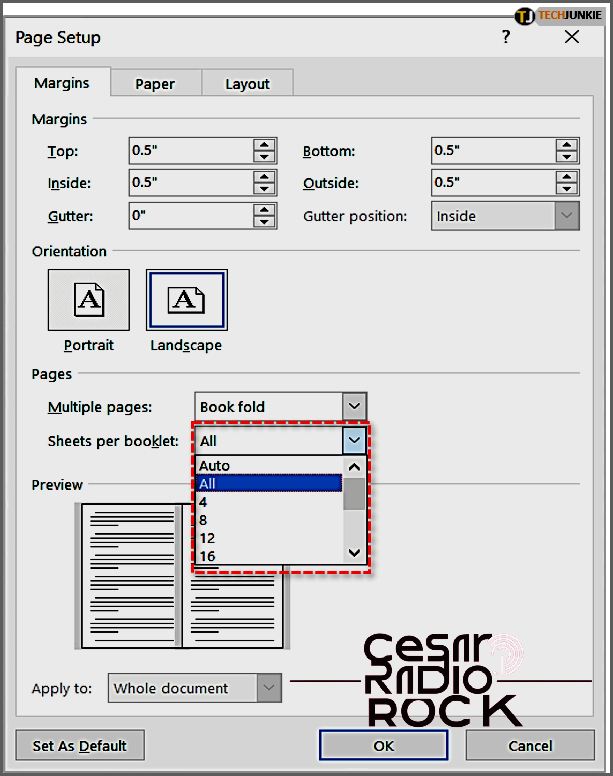
If you’re working with a lengthy Word document, it’s recommended to divide it into two or three booklets. This makes it easier to bind them together without any printing or binding issues. To accomplish this, go to “Sheets per booklet” and choose the desired number of pages for each booklet.
Step 3
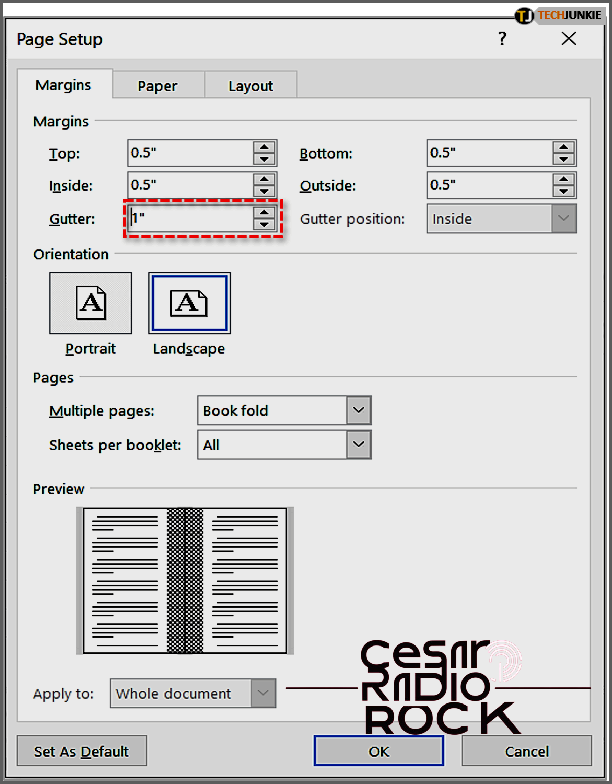
Alright, so now we gotta fix up those Gutter thingies. The Gutter, if you don’t know, is like where Word puts those margin lines in the middle of the page. Right now, they’re set to zero, but we want to make ’em a little bigger and more noticeable, so let’s bump ’em up to 1.
Have you ever noticed how sometimes the words in a booklet can get all mixed up and jumbled? It can be quite frustrating, especially when the booklet has already been printed and bound. Thankfully, there’s a simple way to prevent this problem!
When you’re making adjustments to your booklet, be sure to click OK once you’re finished. This will allow you to preview the changes and ensure everything looks right.
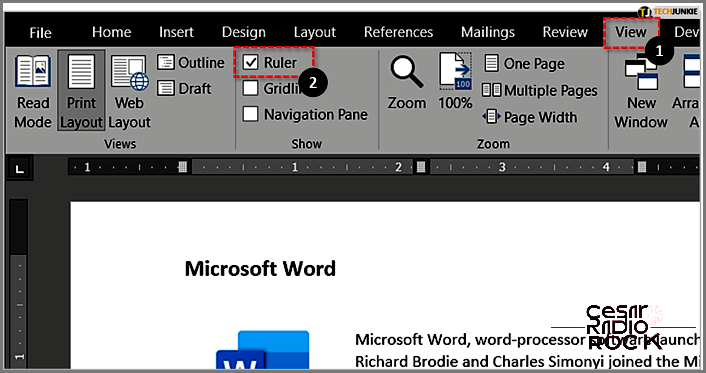
Here’s a helpful tip: If you enable the ruler, you’ll have even more control over the layout of your pages. To do this, just go to the View tab and click on Ruler in the “Show Group.” With the ruler, you can manually adjust the margins and gutters, making it much easier to insert images, graphs, and other media into your booklet.
Step 4
Now it’s time for the next step. Just click on the Paper tab in the Page Setup window. You might be wondering why we’re doing this, but trust me, it’s important. This is where you get to make some choices about how your printout will look.
The first thing you’ll see is a dropdown menu called “Paper Size”. This is where the magic happens. Depending on your preferences, you can choose different sizes for your paper. Want something small and compact? Go for it. Need something big and spacious? No problem. The choice is yours.
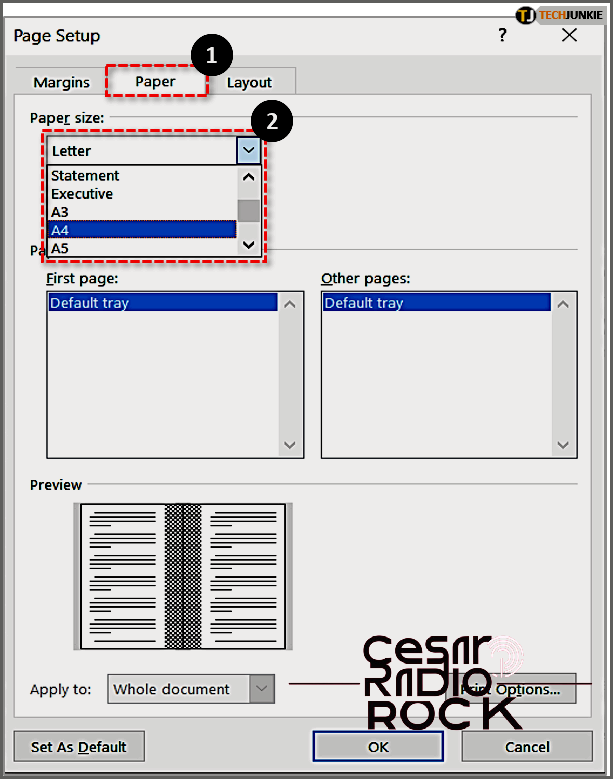
Let me explain something important to you: the booklet will only be half the size of the paper. Oh, and don’t you dare forget to use the right type of paper in your printer.
Step 5
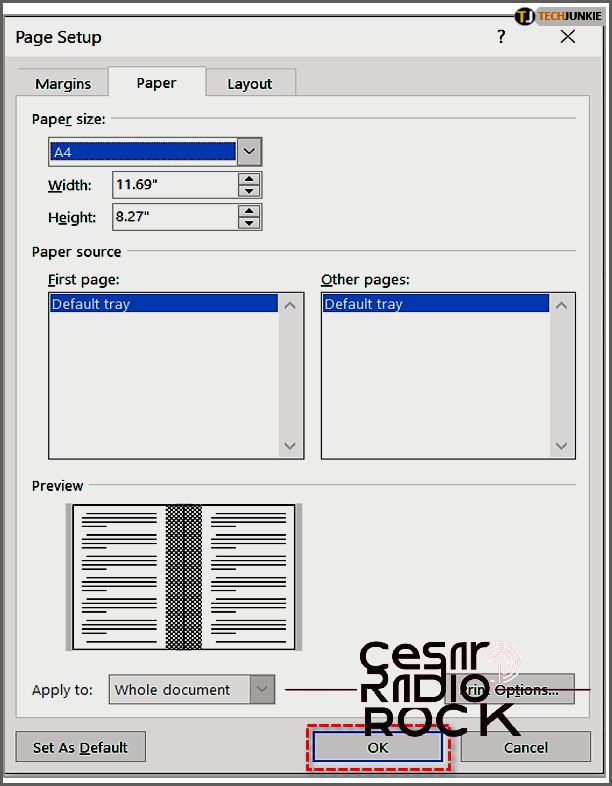
Alright, now for the final step. Just click the OK button at the bottom of the Page Setup window, and like magic, your document will be formatted perfectly. Now, here’s a heads-up: you might have to do some manual tweaking for any tables or images you have.
Unleashing the Magic: Elevate Your Booklet Design with Creative Flourishes
Feeling the need to sprinkle a touch of charm and sophistication onto your booklet? Look no further! I have some ingenious tips and tricks up my sleeve to help you turn heads and make an unforgettable impression.
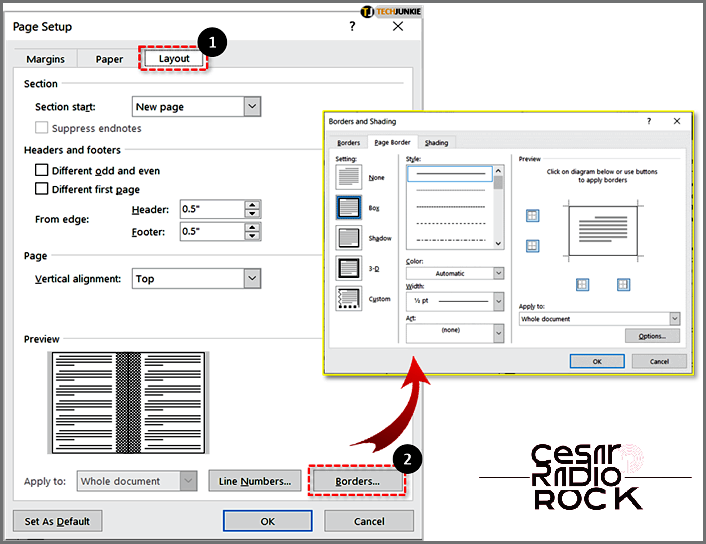
One surefire way to enhance the visual appeal and professionalism of your booklet is by adding borders. These elegant, decorative outlines create a sense of refinement and elevate your design to new heights. Ready to bring some flair to your creations? Let’s dive in!
To begin, we’ll venture into the enchanted realm of Page Setup. Here, we’ll unlock the secret to captivating borders. Simply follow my lead: select the Layout tab and prepare to step into a world of endless possibilities.
Once you’ve arrived at the Borders section, prepare yourself for a feast of choices. Delicate lines or bold patterns? The decision is yours. Go ahead and select the perfect border style that aligns with your creative vision.
With a click or two, behold the stunning transformation of your booklet. It’s as if an artist’s brush has gently traced its magical strokes, breathing life into your creation. Voilà! The transformation is complete, and your booklet now exudes an enchanting beauty.
Take a moment to marvel at the masterpiece you’ve crafted. See how those simple borders have elevated your booklet design to new realms of elegance and professionalism. You’ve taken a step towards making a lasting impression on your readers.
Embrace the power of these embellishments and prepare to dazzle your audience. Allow your creativity to roam free and unlock the hidden potential within your booklet. With these tricks at your disposal, the possibilities are endless.
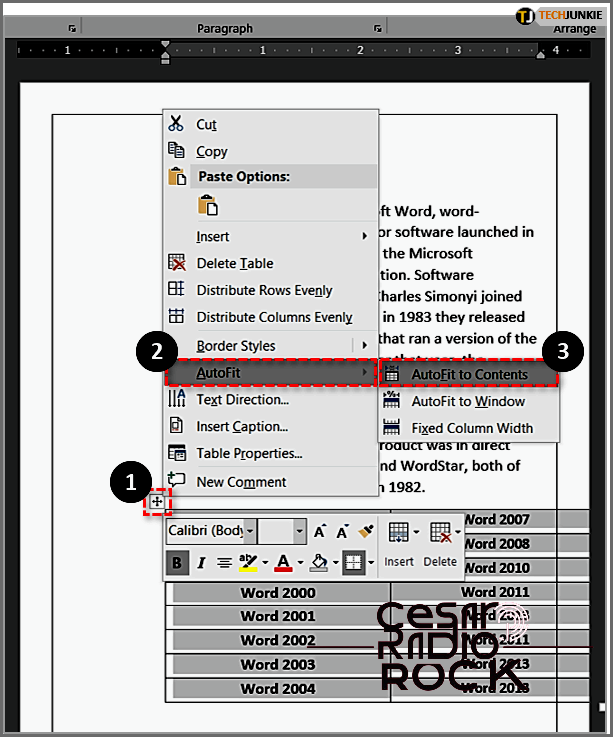
When it comes to creating a booklet, tables and table formatting can be quite tricky. But don’t worry, you don’t have to stress about tables that are out of line. Just follow these simple steps. First, select your table. Then, click on the small handle located at the top left corner. Next, choose the option called “AutoFit” from the menu. Finally, select “AutoFit to Contents” from the AutoFit menu. And that’s it! You’re all set and ready to continue with your designing.
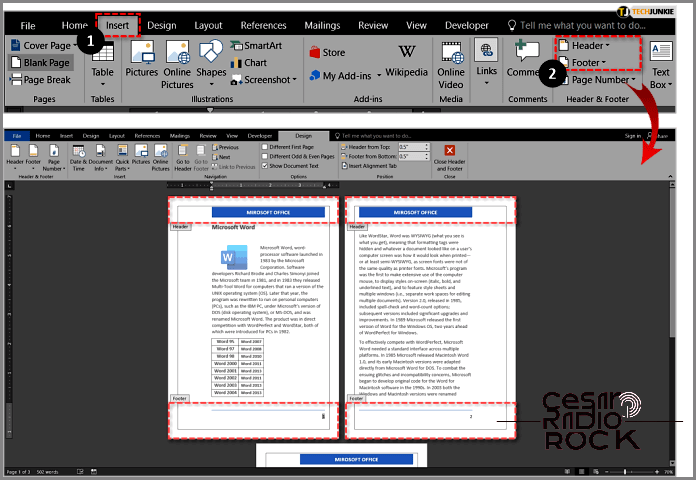
Hey there! As you’re working on it, how about using some other Word editing tools to make the booklet even better? If you click on the Insert tab, you can easily add a header and a footer to your document. And guess what? You can also add page numbers from that same tab, giving your booklet a polished and professional look.
Printing Your Booklet
By now, you should have everything in order to print your document. Printing a booklet is not complicated, but there are a few things to keep in mind.
First off, make sure your printer settings are set to print on both sides. If it doesn’t do it automatically, you’ll need to flip the pages correctly. Here’s a quick guide on how to print:
Step 1: Accessing Print Settings
To access the print settings window, select “File” and then “Print.” You can also find a print icon in the toolbar, or use the shortcut Ctrl + P (on PCs) or Cmd + P (on a Mac).
Step 2: Choosing Printing Options
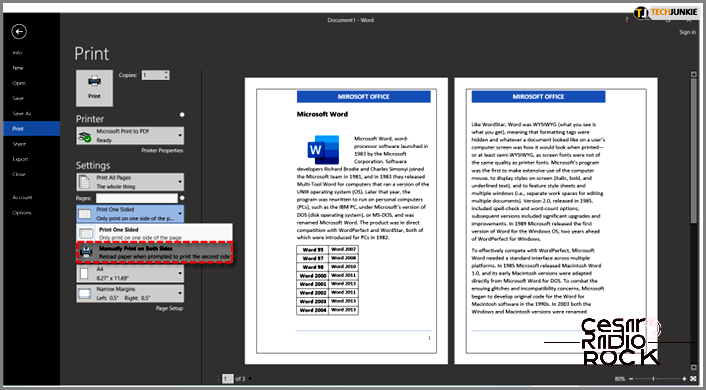
Click on “Settings” and select your printing options. If your printer supports double-sided printing, choose this option from the dropdown menu under “Pages.” It’s also important to select “Flip pages on short edge” to ensure the second page is printed correctly.
If your printer doesn’t support double-sided printing, choose “Manually Print on Both Sides.” This means you’ll have to flip the pages yourself when prompted. Be sure to carefully follow the flipping instructions to avoid printing upside down or overlapping text.
Take Control of Publishing
Let me tell you, Word is your ticket to creating a fabulous booklet or an entire book. The possibilities are endless, and it’s all up to you to make it stand out.
What type of booklet are you aiming for with these steps? Is it for work or for school? Share your ideas with us in the comments below.
